


BMW X1 F48 (2016-2018) & X2 F47 (2018) Carbon Fiber Style ABS Plastic Center Console Trim
£ 37.99
BMW · X1 F48 & X2 F47 · Interior Trim
BMW X1 F48 & X2 F47 Carbon Fiber Style Center Console Trim
Elevate your interior with premium carbon fiber styling that transforms your center console in minutes.
F48 / F47
2016–2018
ABS Plastic
Carbon Fiber
No Modifications
Overview
The BMW X1 F48 (2016–2018) and X2 F47 (2018) are compact SUVs engineered for style and performance. To match that precision, your interior deserves the same attention to detail that BMW applied to the exterior.
This premium carbon fiber style center console trim elevates the X1 and X2's cabin aesthetic with a sleek, modern finish. Crafted from high-quality ABS plastic with an authentic carbon fiber appearance, this trim piece adds visual depth and sophistication to your dashboard without compromising durability or function.
Installation is straightforward—no drilling, cutting, or modifications required. Whether you drive left-hand or right-hand configuration, this trim fits both perfectly, delivering instant visual impact and a more premium feel every time you sit behind the wheel.
What's Included
📦
Center Console Trim Strip
Premium ABS plastic, carbon fiber finish
✓
Pre-Fitted Design
Ready to install, no adjustments needed
Product Highlights
Premium ABS plastic with authentic carbon fiber appearance
Direct fit for X1 F48 and X2 F47—no modifications required
Universal compatibility with left-hand and right-hand drive vehicles
Enhanced interior aesthetics with minimal installation effort
Durable, impact-resistant construction for long-term use
Factory-finished edges and seamless integration
Easy to clean and maintain with standard interior care products
Lightweight design—no additional burden on your vehicle
Elevates cabin ambiance without altering vehicle function
Perfect complement to other interior upgrades and customizations
Compatibility
Vehicle Model
Year Range
Drive Config
Status
BMW X1 F48
2016–2018
LHD / RHD
Direct Fit
BMW X2 F47
2018
LHD / RHD
Direct Fit
Compatibility Note: Verify your vehicle's model year and body code (F48 or F47) before ordering. This trim is not compatible with earlier or later generation models.
Installation Guide
Difficulty Level: Beginner | Time: 10–15 minutes
Ensure your vehicle is parked safely with the engine off and the interior at room temperature.
Carefully examine the center console area to identify the mounting location for the trim strip.
Clean the console surface with a dry, lint-free cloth to remove dust and debris.
Align the trim strip with the center console opening, ensuring proper fit on both sides.
Gently press the trim into place, applying even pressure across the entire strip until it sits flush.
Check all edges and corners to confirm secure installation and proper alignment.
Allow the adhesive (if applied) to set for 24 hours before using the center console.
Wipe the finished trim with a soft microfiber cloth for a polished appearance.
Important: Do not force the trim into place. If resistance is felt, remove and recheck alignment. Always follow the vehicle's manual for interior component safety guidelines.
Ready to Upgrade Your Interior?
Transform your BMW X1 or X2 cabin with premium carbon fiber styling. This center console trim delivers instant visual impact with zero fuss—order now and elevate your driving experience.
Shop Now
Use code 22GET20 for 20% off any 2 items
4.9/5 Stars (12,300+ Reviews)
✓ 30-Day Money-Back Guarantee
✓ Worldwide Shipping
📞 +44 203 943 9919
Victorious Automotive is an independent aftermarket specialist and is not affiliated with BMW, Bayerische Motoren Werke AG, or any official BMW dealer. All vehicle names, logos, and specifications are used for reference and compatibility purposes only. Product fitment and compatibility are the buyer's responsibility to verify before purchase.


BMW X1 F48 (2016-2018) Carbon Fiber Style Front Fog Light Lamp Cover Trim – Set of 2, Chrome Finish
£ 33.25
BMW Exterior · X1 F48 · Fog Light Trim
BMW X1 F48 Carbon Fibre Style Fog Light Covers – Set of 2, Chrome Trim
Premium carbon fibre aesthetics with durable chrome finish for effortless front-end refinement.
F48
2016–2018
Carbon Fibre Style
Chrome Finish
Direct Fit
Overview
The BMW X1 F48 (2016–2018) is a compact crossover engineered for agility and presence on urban streets and country roads alike. These fog light covers elevate the front fascia with a contemporary carbon fibre aesthetic that complements the X1's purposeful stance.
Our carbon fibre style covers are precision-crafted in high-quality ABS plastic with a chrome-trimmed edge, delivering the visual impact of motorsport-inspired design without compromising durability. Each set includes left and right covers that integrate seamlessly with your vehicle's existing geometry—no modifications required.
Whether you're refreshing a daily driver or preparing for a weekend drive, these covers offer immediate visual uplift, practical light protection, and installation that respects your time and investment.
What's Included
⬛
Left Fog Cover
Carbon fibre finish with chrome trim
⬛
Right Fog Cover
Carbon fibre finish with chrome trim
Product Highlights
Carbon fibre style finish for premium aesthetic appeal
Durable ABS plastic construction resists UV and weathering
Chrome-trimmed edges add distinction and depth
Precise fit—engineered for F48 fog light geometry
Direct installation without body modifications
Protects fog lights from road debris and minor impact
Lightweight design maintains handling balance
Compatible with OE and aftermarket lighting setups
Easy to clean and maintain
Pair with other F48 exterior upgrades for cohesive styling
Compatibility
Model
Year Range
Status
BMW X1 F48
2016–2018
Direct Fit
BMW X1 F48 (Pre-2016)
Before 2016
Not Compatible
BMW X1 F48 (Post-2018)
2019+
Not Compatible
Other BMW Models
All Years
Not Compatible
Installation
Difficulty Level: Beginner | Time Required: 15–20 minutes per side
Park on level ground and ensure the engine is cool.
Open the bonnet and locate the fog light housing on the driver's side.
Gently remove any existing trim clips or fasteners holding the old cover (if applicable).
Align the new carbon fibre cover with the fog light opening and the mounting points.
Secure using OE clips or the provided adhesive tabs—press firmly for 30 seconds.
Repeat steps 2–5 for the passenger side.
Verify both covers sit flush and symmetrically; test fit with lights on to confirm proper alignment.
Allow adhesive to cure for 2 hours before driving, if applicable.
Note: If your X1 has been previously modified or has non-standard bumper components, verify fitment before final installation. Professional fitting is always recommended for peace of mind.
Ready to Refine Your X1
These carbon fibre style fog light covers transform the front-end character of your F48 in minutes. Clean, modern, and built to last.
Shop Now
Use code 22GET20 for 20% off any 2 items.
⭐ 4.9/5 from 12,300+ reviews
📦 Worldwide DHL, FedEx, UPS, TNT shipping
✓ 30-day money-back guarantee
📞 +44 203 943 9919 · Mon–Fri 9am–7pm
Disclaimer: This product is not affiliated with, endorsed by, or authorised by BMW AG or Bayerische Motoren Werke. "BMW," "X1," and all related marks are registered trademarks of BMW AG. This listing describes an aftermarket accessory. Always verify vehicle compatibility before purchase. Victorious Automotive is an independent retailer of premium automotive accessories.

BMW X1 F48 2016-2017 & 2 Series 218i Gran Tourer F46 2015-2017 Carbon Fiber Style ABS Gear Shift Head Cover Trim
£ 34.19
Automotive · BMW Interior · Trim Accessories
Carbon Fiber Style Gear Shift Head Cover Trim – BMW X1 F48 & 2 Series F46
Premium ABS carbon fibre finish elevates your interior with a sophisticated, modern aesthetic that commands attention.
X1 F48
2 Series F46
2015–2017
Carbon Fiber Style
ABS Plastic
Easy Install
Overview
Your BMW X1 F48 or 2 Series 218i Gran Tourer F46 deserves interior finishes that reflect its premium engineering. This carbon fibre style gear shift head cover trim is engineered to transform your centre console with a contemporary, upmarket appearance whilst maintaining complete OEM compatibility.
Crafted from high-grade ABS plastic with an authentic carbon fibre weave texture, this trim piece slides seamlessly into your cabin's design language. The finish is scratch-resistant, UV-stable, and designed to withstand daily use without fading or peeling. Installation is straightforward—no drilling, cutting, or modification required.
Whether you're upgrading an existing interior or completing a bespoke customisation project, this gear shift cover instantly elevates the perceived quality of your cockpit. Pair it with other interior trim accents for a fully cohesive look that turns heads every time you grip the gear knob.
What's Included
📦
Gear Shift Head Cover Trim
Premium ABS with carbon fibre finish
📋
Installation Instructions
Step-by-step guidance + fitment tips
✔️
Pre-Fitted Template
Ensures precise alignment first time
Product Highlights
Authentic carbon fibre texture with premium gloss finish
High-quality ABS plastic—lightweight yet durable
Pre-contoured to match your gear knob enclosure perfectly
Double-sided automotive-grade adhesive backing
No drilling, cutting, or professional installation needed
UV-stable formula resists fading and discolouration
Scratch-resistant surface withstands daily handling
Adds sophisticated visual depth to your centre console
Compatible with both manual and automatic transmissions
Backed by our 30-day money-back guarantee
Compatibility
Vehicle Model
Year Range
Fitment
BMW X1 F48
2016–2017
Direct Fit
BMW 2 Series 218i Gran Tourer F46
2015–2017
Direct Fit
Other BMW models
—
Not Compatible
Always verify your vehicle model and build code before purchase. Contact our team if you're unsure about fitment.
Installation
Difficulty Level: Beginner | Time: 10–15 minutes
Clean the surface: Use rubbing alcohol and a lint-free cloth to thoroughly clean the existing gear shift head area. Allow to air dry completely.
Position the trim: Carefully align the cover trim with your gear knob enclosure. Start from the centre and work outward to avoid air bubbles.
Apply pressure: Press firmly across the entire surface for 30–60 seconds to activate the adhesive bond.
Set cure time: Allow 24 hours before using the gear shift to ensure maximum adhesive strength.
Inspect edges: Once cured, check all perimeter edges are fully seated. Apply extra pressure if needed.
Note: Ensure the interior is clean and dry before installation. Do not apply in temperatures below 10°C or above 40°C for optimal adhesive performance. If repositioning is needed within the first hour, gently peel back and reapply.
Why Choose Victorious Automotive
We specialise in premium automotive interior and exterior upgrades for discerning drivers who refuse compromise on quality. Every product in our collection is hand-selected, tested, and backed by our promise: if you're not completely satisfied, we'll refund you within 30 days, no questions asked.
Our team has over a decade of experience sourcing and fitting bespoke accessories across BMW, Mercedes, Land Rover, and Range Rover platforms. We're not just sellers—we're automotive enthusiasts who understand what drives your passion.
Ready to Elevate Your Interior?
Transform your gear shift area with premium carbon fibre styling. Fast worldwide shipping, expert support, and a full 30-day guarantee included.
Add to Cart
Use code 22GET20 for 20% off any 2 items
4.9★ Rating · 12,300+ verified reviews
🌍 Worldwide DHL, FedEx, UPS, TNT shipping
📞 +44 203 943 9919 · Mon–Fri 9am–7pm
✓ 30-day money-back guarantee
Victorious Automotive is not affiliated with, endorsed by, or connected to BMW, Bayerische Motoren Werke AG, or any of their subsidiaries. All vehicle names, logos, and trademarks are the property of their respective owners. This product is a non-OEM aftermarket accessory designed for fitment purposes only. We recommend professional installation if you are unfamiliar with automotive trim work. Victorious Automotive accepts no liability for improper installation or vehicle damage resulting from product misuse.

BMW X1 F48 2016-2017 Carbon Fiber Style ABS Chrome Navigation Panel Frame Cover Trim
£ 33.24
Victorious Automotive · BMW X1 · Interior Trim
BMW X1 F48 Carbon Fiber Style Navigation Panel Cover 2016–2017
Elevate your X1 dashboard with a premium carbon fiber aesthetic and OEM-precise fitment.
F48 2016–2017
Carbon Fiber ABS
Navigation Trim
Direct Fit
Lightweight
Overview
The BMW X1 F48 deserves interior upgrades that match its modern engineering. This Carbon Fiber Style Navigation Panel Frame Cover transforms your dashboard with a sophisticated, contemporary finish that looks far more expensive than its price suggests.
Manufactured from premium ABS plastic with a realistic carbon fiber weave pattern and chrome accents, this trim piece integrates seamlessly around your infotainment display. Every detail—from edge alignment to button apertures—is engineered for a factory-quality installation that requires no modifications to your vehicle.
Whether you're refreshing a daily driver or preparing your X1 for concours-level presentation, this cover delivers visual impact without compromise. Lightweight construction means zero added weight penalty, and the durable ABS polymer resists UV fading and daily wear far better than genuine carbon fiber at a fraction of the cost.
What's Included
📦
Carbon Fiber Navigation Cover
Pre-fitted, ready to install
✓
Chrome Surround Trim
Integrated accent detail
📋
Installation Guide
Step-by-step instructions
🛡️
30-Day Money-Back
Full satisfaction guarantee
Product Highlights
Authentic carbon fiber weave pattern with UV-resistant coating
Chrome trim ring complements factory X1 interior design language
Lightweight ABS construction (50g) — no load on dashboard
Factory-precise fitment — no drilling, cutting, or modification required
ISO9001 certified manufacturing for quality assurance
Durable material resists fingerprints and daily wear
Seamless integration with factory buttons and controls
Perfect complement to other F48 carbon accents and trim upgrades
Easy clip-mount installation — under 15 minutes
Backed by Victorious' 30-day returns and world-class support
Compatibility
Model
Year Range
Fitment
BMW X1 (F48)
2016–2017
Direct Fit
BMW X1 (F48)
2018+
Not Compatible
Other BMW Models
All Years
Not Compatible
Note: Verify your vehicle's production year before purchase. 2018+ F48 models feature a revised dashboard layout. Please contact us at +44 203 943 9919 with any fitment questions.
Installation
Difficulty Level: Beginner | Time: 10–15 minutes
Power off your vehicle and allow the dashboard to cool to room temperature.
Gently pry the existing navigation panel trim using a soft plastic trim tool, starting at the top corner.
Carefully disconnect any wiring harnesses (some trims have integrated trim lighting; note connection points).
Position the new Carbon Fiber cover and align it precisely with the dashboard opening.
Press firmly into the clip mount points until you hear two audible clicks—one at each corner.
Reconnect any wiring and power on your vehicle to test all functions.
Step back and admire the upgrade.
⚠️ Caution: Do not force the trim into place. If resistance is felt, check alignment. Forcing may crack the clip tabs. If you're uncomfortable with DIY installation, we recommend professional fitment at a BMW specialist workshop.
Ready to Upgrade Your X1?
Transform your BMW X1 F48 interior with this stunning carbon fiber trim. It's the perfect finishing touch for owners who demand authenticity and style in equal measure. Ships worldwide within 3–5 business days via DHL, FedEx, or UPS.
Shop Now
Use code 22GET20 for 20% off when you purchase any 2 items.
⭐ 4.9/5 from 12,300+ reviews
🌍 Worldwide shipping included
✓ 30-day money-back guarantee
📞 +44 203 943 9919 Mon–Fri 9am–7pm
Victorious Automotive is an independent aftermarket specialist and is not affiliated with BMW, Bayerische Motoren Werke AG, or any official BMW subsidiary or distributor. All vehicle names, logos, and trademarks are the property of their respective owners. This product is designed for the 2016–2017 BMW X1 (F48) and is sold as an aesthetic upgrade only. Installation may affect warranty coverage—consult your BMW dealer before proceeding.


BMW X1 F48 2016-2018, X2 F47 2018 Carbon Fiber & Chrome Side AC Vent Trim Cover Set - 4 Pieces
£ 37.99
```html
BMW · X1 F48 / X2 F47 · Interior Trim
BMW X1 F48 & X2 F47 Carbon Fiber Side AC Vent Trim – 4-Piece Set
Upgrade your cabin with premium carbon fiber air vent covers that deliver luxury detail and seamless OEM fitment.
F48 2016–2018
F47 2018+
Carbon Fiber ABS
Chrome Accents
3M Adhesive
Plug & Play
Overview
The BMW X1 F48 (2016–2018) and X2 F47 (2018+) deserve interior details that match their premium engineering. These carbon fiber side AC vent trim covers elevate your cabin aesthetic with a race-inspired finish that catches light and adds visual depth to your dashboard.
Built from durable ABS plastic with a hand-finished carbon fiber texture, this 4-piece set wraps your console air vents in modern luxury. Each cover is precisely cut and moulded to fit seamlessly against the original trim, with zero gaps or overhang. Installation is tool-free—3M adhesive backing handles everything, and you'll have it done in under 15 minutes.
Why upgrade? Standard plastic vents age quickly and lack presence. These carbon fibre covers inject personality into a crucial interior focal point, complementing sportline, M-Sport, and stock trims alike. The subtle chrome edge banding prevents that flat look and ties the whole cabin together.
What's Included
📦
4x Vent Covers
Left & right console, passenger & driver-side AC vents
🧴
3M Adhesive Backing
Pre-applied, removable within 24 hours if needed
📋
Installation Guide
Step-by-step photo instructions included
🔒
Fitment Guarantee
30-day money-back guarantee on all items
Product Highlights
Premium carbon fibre ABS construction with tactile weave texture
OEM-spec fitment with zero drilling, cutting, or modification required
Chrome edge accents for contrast and premium detail
3M automotive-grade adhesive backing for permanent hold
Lightweight design—adds visual impact without weight penalty
UV-resistant finish resists fading in direct sunlight
Hydrophobic surface sheds water, dust, and oils easily
Factory-matched colour integration with X1 & X2 cabin design
Suitable for all trim levels—SE, xDrive, M Sport, Luxury
Made to automotive durability standards; 3-year longevity guarantee
Compatibility
Model
Year Range
Fitment
BMW X1 F48
2016–2018
Direct Fit
BMW X2 F47
2018+
Direct Fit
BMW X1 F49 (G11)
2023+
Not Compatible
BMW X3 / X4
All years
Not Compatible
Fitment Note: This set is engineered exclusively for F48 and F47 generation X1 and X2. Verify your vehicle generation before purchase to avoid fitment issues.
Installation
Difficulty: Beginner | Time: 10–15 mins
Clean the vent surface. Use a microfibre cloth with isopropyl alcohol to remove dust, oils, and residue. Allow 5 minutes to dry completely.
Peel the adhesive backing. Slowly remove the protective paper layer from the back of each cover. Do not touch the adhesive surface.
Align the first cover. Position on the driver-side console vent. Start from the top edge and press downward slowly to avoid air bubbles.
Press firmly for 30 seconds. Apply steady pressure across the entire surface, especially along the edges.
Repeat for remaining covers. Follow the same process for the passenger console vent and both rear cabin vents (if included).
Allow 24 hours cure time. Avoid touching, cleaning, or vibration until the adhesive fully sets. Do not open air vents for at least 6 hours.
Pro Tip: Work in a warm, dry environment (18–25°C). Cold temperatures slow adhesive activation. If repositioning is needed within 24 hours, gently peel and re-apply without loss of hold.
Ready to elevate your X1 or X2?
These carbon fibre vent covers deliver the interior refresh your BMW deserves. Precision fitment, premium materials, and tool-free installation make them the smart choice for discerning owners.
Shop Now
Use code 22GET20 for 20% off when you buy any 2 items from our BMW collection.
30-day guarantee – full refund if not satisfied
4.9★ – 12,300+ verified reviews
Worldwide shipping – DHL, FedEx, UPS, TNT
Expert support – +44 203 943 9919, Mon–Fri 9am–7pm
Victorious Automotive is not affiliated with BMW AG, Bayerische Motoren Werke, or any official BMW subsidiary. All product names, logos, and trademarks are the property of their respective owners. This product is designed as an aftermarket accessory and is sold as-is without warranty from the vehicle manufacturer.
```


BMW X1 F48 2016-2019 and BMW X2 F47 2018-2019 LHD ABS Central Control Multimedia Panel
£ 28.50
BMW · X1 F48 / X2 F47 · Interior
BMW X1 F48 & X2 F47 LHD ABS Central Control Multimedia Panel
Premium matte-finish control panel engineered for seamless integration into your BMW's central console.
X1 F48 2016–2019
X2 F47 2018–2019
LHD Only
ABS Material
Matte Finish
Adhesive Install
Overview
Designed specifically for the BMW X1 F48 (2016–2019) and BMW X2 F47 (2018–2019) left-hand drive models, this central control multimedia panel elevates your cabin's interior aesthetic with a contemporary matte finish that complements modern BMW design language.
Crafted from high-quality ABS plastic, this panel delivers durability and precision engineering. It's engineered to fit exactly where the original console meets the multimedia area, creating a seamless, integrated appearance without compromise. Whether you're refreshing an aging interior or restoring your cabin to near-factory condition, this panel slots in perfectly.
Installation is straightforward: the included industrial-grade double-sided adhesive ensures a permanent, secure bond that won't shift or rattle. No drilling, cutting, or modification of your vehicle required. Simply clean the mounting surface, apply the adhesive, and press firmly into place.
What's Included
📦
Central Control Panel
ABS, matte black, precision-fit
🔗
Double-Sided Adhesive
Pre-applied or supplied separately
📋
Installation Guide
Clear step-by-step instructions
Product Highlights
High-quality ABS construction for durability and impact resistance
Matte finish eliminates glare and suits modern cabin aesthetics
Precision-engineered tolerances ensure flush fit with factory panels
Pre-measured double-sided adhesive for hassle-free installation
100% brand new, never used or refurbished
Factory-correct colour match and texture
No tools or modifications required for installation
Lightweight design won't affect vehicle weight distribution
Covers wear, scratches, and discoloration on original console
Perfect restoration or cosmetic upgrade for X1 and X2 owners
Compatibility
Vehicle Model
Years
Drive
Compatibility
BMW X1 F48
2016–2019
LHD
Direct Fit
BMW X2 F47
2018–2019
LHD
Direct Fit
BMW X1 F48
2016–2019
RHD
Not Compatible
BMW X2 F47
2018–2019
RHD
Not Compatible
Other BMW Models
Any
Any
Not Compatible
Installation Notes
Difficulty: Easy | Time: 10–15 minutes
Prepare the surface: Clean the central console area with a microfibre cloth and mild alcohol-based cleaner. Remove any dust, grease, or residue. Allow to dry completely (minimum 5 minutes).
Position the panel: Dry-fit the panel into place without adhesive. Ensure all edges align perfectly with surrounding trim and that there are no obstructions.
Apply adhesive: If adhesive is not pre-applied, carefully apply the double-sided tape to the rear surface of the panel, following the template or existing markings.
Press into place: Firmly press the panel onto the console, working from the centre outward to avoid air pockets. Hold pressure for 30 seconds.
Cure time: Avoid touching or moving the panel for at least 24 hours to allow the adhesive to set fully.
⚠️ Important: This panel is adhesive-only and cannot be removed without risk of damage. Test fit thoroughly before final installation. Ensure your console is clean and dry for maximum adhesion strength.
Transform Your BMW Interior Today
Refresh your X1 or X2 cabin with a factory-quality central control panel that looks and fits like it came straight from the factory floor. Premium ABS construction, perfect fit, simple install.
Shop Now
Use code 22GET20 for 20% off any 2 items
✓ 30-Day Money-Back Guarantee
✓ 4.9/5 Stars – 12,300+ Reviews
✓ Worldwide Shipping – DHL, FedEx, UPS, TNT
✓ Expert Support – +44 203 943 9919
Victorious Automotive is an independent aftermarket automotive specialist and is not affiliated with BMW AG, Bayerische Motoren Werke, or any official BMW distributor. All product descriptions, fitment information, and compatibility claims are provided for reference only. Customers are responsible for verifying compatibility with their specific vehicle variant before purchase. Installation of aftermarket products may affect warranty coverage; consult your dealer if concerned. All sales are final unless covered under our 30-day money-back guarantee.


BMW X1 F48 Front Bumper Styling Trim, ABS Chrome/Carbon Fiber, 2020-2021 Models
£ 40.84
Victorious · BMW X1 · Exterior Trim
BMW X1 F48 Front Bumper Styling Trim – Chrome & Carbon Fiber
Premium ABS trim upgrade that elevates your X1's front-end presence with refined chrome or carbon fiber finish.
F48
2020–2021
ABS Material
Chrome/Carbon Fiber
Easy Installation
Overview
Your BMW X1 F48 deserves styling details that match its sophisticated engineering. This front bumper trim element transforms the lower bumper area with a sleek, purposeful accent that catches light beautifully—whether you choose the reflective chrome finish or the aggressive matte carbon fiber option.
Crafted from durable engineering-grade ABS plastic, this trim piece is designed to withstand daily driving conditions whilst maintaining its lustrous appearance. The adhesive-backed installation means no drilling or permanent modifications—simply clean, apply, and secure. It integrates seamlessly with your X1's factory bumper design for a factory-fitted look.
At just 300g and finished to ISO9001 standards, this is a straightforward way to add visual presence and personality to your F48 without compromise.
What's Included
📦
Front Bumper Trim Element
LLK2787 – 30cm × 15cm
🔧
Pre-Applied Adhesive Tape
Ready-to-install backing
📋
Installation Guide
Step-by-step instructions included
Product Highlights
Engineered ABS material – UV-resistant and weatherproof
Chrome or carbon fiber finish options – choose your aesthetic
Pre-applied automotive-grade adhesive tape – no tools needed
Lightweight 300g design – zero impact on performance
ISO9001 certified quality standards – trusted manufacturing
Factory-fitted appearance – integrates with OEM bumper design
Perfect 30cm length – covers key visual zone
10cm depth profile – proportioned for F48 bumper geometry
Quick 15-minute installation – no professional help required
Long-term durability – maintains finish in all climates
Compatibility
BMW X1 Model
Generation
Compatibility
BMW X1 sDrive18i, xDrive20i
F48 (2020–2021)
Direct Fit
BMW X1 xDrive30i, M40i
F48 (2020–2021)
Direct Fit
BMW X1 Pre-2020 Models
F48 (2015–2019)
Verify Fitment
BMW X1 G11 (2023+)
F49 (New Generation)
Not Compatible
Installation Notes
Difficulty Level: Beginner | Time: 15–20 minutes
Prepare the bumper. Park on level ground and allow the vehicle to cool. Clean the bumper surface thoroughly with soap and warm water. Dry completely with a microfibre cloth.
Degrease the surface. Use isopropyl alcohol on a clean cloth to remove any residual wax, polish, or contamination. This ensures optimal adhesive bonding.
Position the trim. Remove the backing from the pre-applied adhesive tape slowly. Align the trim carefully with your bumper's lower edge, checking level with your eye.
Apply with pressure. Press the trim firmly along its entire length for 10–15 seconds. Use steady, deliberate pressure to ensure full contact.
Allow curing time. Wait 24 hours before driving or exposing the vehicle to water. The adhesive reaches full strength after this period.
⚠ Note: Ensure the bumper surface is completely dry before installation. Any moisture will compromise adhesive bonding and long-term durability. If ambient temperature is below 10°C, allow extra curing time.
Elevate Your X1 Today
Add purposeful styling to your BMW X1 F48 with this premium front bumper trim. Choose chrome for reflective elegance or carbon fiber for aggressive sportiness. Clean installation, factory appearance, professional results.
Shop Now
Use code 22GET20 for 20% off any 2 items
⭐ 4.9/5 – 12,300+ verified reviews
🌍 Worldwide shipping via DHL, FedEx, UPS, TNT
💰 30-day money-back guarantee
📞 Expert support: +44 203 943 9919
Disclaimer: Victorious Automotive is an independent aftermarket specialist. We are not affiliated with, endorsed by, or connected to BMW, Bayerische Motoren Werke AG, or any official BMW subsidiary. All product names, logos, and trademarks are the property of their respective owners. This product is designed for compatibility but does not alter or void manufacturer warranties. Always verify fitment with your vehicle's specific model year and trim level before purchase.


BMW X3 F25 (2014-2017) Interior Armrest Main Drive Handle Trim – 3 Color ABS Plastic, Inside Handle Box Frame Storage
£ 43.69
BMW · X3 F25 · Interior Trim
BMW X3 F25 Interior Armrest & Handle Trim Kit – 3 Color ABS Plastic Storage
Upgrade your cabin with premium ABS plastic interior trim – available in Carbon Fiber, Silver, and Oak Wood Grain finishes.
F25 2014–2017
ABS Plastic
Interior Handle
Armrest Trim
3 Colors
Box Frame Storage
Overview
The BMW X3 F25 (2014–2017) deserves interior details that match its refined engineering. This premium armrest and interior handle trim kit elevates your cabin aesthetic while adding functional storage access through the integrated box frame design.
Constructed from durable ABS plastic and finished in your choice of three sophisticated colorways—Carbon Fiber, Silver, or Oak Wood Grain—these trims deliver both visual impact and durability. The lightweight material resists cracking and discoloration, ensuring your interior investment lasts season after season.
Installation is straightforward with included automotive-grade adhesive tape. No drilling, no modification, no specialist tools required. Within 30 minutes, your cabin gains a cohesive, factory-finished upgrade that transforms the driving environment.
What's Included
📦
Interior Handle Trim Kit
Main drive handle & armrest covers
🔗
Automotive Adhesive Tape
Professional-grade 3M backing
📋
Installation Guide
Step-by-step photo instructions
✓
Quality Assurance
ISO9001 certified manufacturing
Product Highlights
Three premium finishes: Carbon Fiber, Silver, Oak Wood Grain
Durable ABS plastic construction resists wear and UV fading
Integrated box frame storage for added cabin functionality
Seamless fit designed specifically for F25 interior geometry
Includes professional automotive adhesive tape for clean install
ISO9001 certified manufacturing ensures consistent quality
No drilling, cutting, or modification required to vehicle
Lightweight design (300g total) won't impact cabin weight
Easy removal without damage if desired
Enhances resale value with OEM-style interior upgrade
Compatibility
BMW Model
Generation
Year Range
Fit Status
BMW X3
F25
2014–2017
Direct Fit
BMW X3
F97 (G01)
2018+
Not Compatible
BMW X4
F26
2014–2018
Not Compatible
Installation Notes
Difficulty: Beginner · Time: 25–35 minutes
Clean interior surfaces with a dry microfiber cloth to remove dust and oils.
Position trim kit against the armrest and handle areas; verify alignment and spacing.
Carefully peel backing from adhesive tape strip by strip, pressing firmly as you apply.
Start from the center of each piece and work outward to avoid air pockets.
Allow adhesive to set for 4–6 hours before using storage compartments or handling controls.
Step back and inspect seams for uniform gaps and alignment with surrounding trim.
Important: Ensure your X3 interior is clean and dry before application. Avoid touching adhesive surfaces with bare hands. If repositioning is needed, work slowly to prevent damage to the tape backing.
Ready to Elevate Your X3 F25 Interior?
This armrest and handle trim kit delivers OEM-quality aesthetics in three designer finishes. Choose your color, install in under 30 minutes, and transform your cabin instantly.
Shop X3 F25 Interior Trim
Use code 22GET20 for 20% off any 2 items
4.9/5 from 12,300+ reviews
30-day money-back guarantee
Worldwide shipping via DHL, FedEx, UPS
+44 203 943 9919 · Mon–Fri 9am–7pm
Disclaimer: This product is not affiliated with, endorsed by, or manufactured by BMW or Bayerische Motoren Werke AG. All vehicle names, logos, and brands are the property of their respective owners. This trim kit is a third-party accessory designed for compatibility with the specified vehicle model(s). Always verify fitment before purchase.


BMW X3/X4 (G01) 2018-2019 Stainless Steel Exhaust Muffler Trim
£ 32.30
Premium Automotive · BMW X3/X4 · Exterior Trim
BMW X3/X4 G01 (2018–2019) Stainless Steel Exhaust Muffler Trim
Premium chromium styling that elevates your X3 or X4's rear-end presence with refined German engineering.
G01
2018–2019
Stainless Steel
Chromium Styling
Direct Fit
Overview
The BMW X3 and X4 G01 generation (2018–2019) represents a significant step forward in luxury compact SUV design. These models demand accessories that match their precision engineering and premium aesthetic. This exhaust muffler trim kit has been engineered specifically to complement the factory rear styling while adding a layer of refined visual depth.
Manufactured from premium stainless steel with a polished chromium finish, this trim piece transforms the exhaust outlet area into a statement of understated elegance. The silvery finish contrasts beautifully against the rear bumper, creating visual interest without appearing aftermarket or heavy-handed. For owners seeking OEM-quality enhancements, this is a thoughtfully executed choice.
The installation process is straightforward, using high-grade automotive adhesive tape engineered for long-term durability in all weather conditions. Whether you're preparing your X3 or X4 for resale, daily driving, or simply refining the details that matter, this trim delivers the kind of incremental quality refinement that distinguishes truly cared-for vehicles from the rest.
What's Included
✦
Exhaust Muffler Trim Pieces
2x stainless steel trim pieces
✓
Adhesive Tape
Professional-grade automotive bonding
📋
Installation Guide
Step-by-step instructions included
🛡
30-Day Guarantee
Full money-back if not satisfied
Product Highlights
Premium stainless steel construction resists oxidation and corrosion for years
Polished chromium finish adds sophisticated visual depth to rear styling
Engineered for 2018–2019 BMW X3 G01 and X4 G01 models
Factory-matched fitment with zero modifications required
ISO9001 certified manufacturing quality standards
Quick installation using professional automotive adhesive tape
Lightweight at 300g — no stress on factory mounts or fasteners
Weather-resistant finish maintains appearance in all climate conditions
Non-destructive installation preserves factory paint and finish
Complements both M Sport and standard X3/X4 rear bumper designs
Compatibility
Model
Year
Status
BMW X3 G01
2018–2019
Direct Fit
BMW X4 G01
2018–2019
Direct Fit
BMW X3 G01
2020+
Not Compatible
BMW X4 G01
2020+
Not Compatible
BMW X3 G02
2021+
Not Compatible
Important: Verify your vehicle's model year and generation code (G01) before purchasing. Fitment is specific to 2018–2019 production runs only.
Installation Notes
Difficulty Level: Easy | Time Required: 15–20 minutes
Clean the exhaust outlet area thoroughly with warm soapy water and allow to dry completely (minimum 30 minutes)
Remove the protective backing from the adhesive tape strips
Carefully position the first muffler trim piece on the driver-side exhaust outlet, ensuring alignment with the bumper edge
Apply firm, even pressure across the entire surface for 10 seconds to activate the adhesive bond
Repeat steps 3–4 for the passenger-side exhaust outlet trim piece
Allow adhesive to cure for 24 hours before washing or driving in wet conditions
Note: Professional installation is recommended for optimal positioning and durability. Poor surface preparation is the leading cause of adhesive failure — invest the extra time in cleaning.
Elevate Your X3 or X4 Today
Small details define the character of a truly refined vehicle. This stainless steel exhaust trim represents the kind of thoughtful enhancement that owners who care about their BMW appreciate. It's not a dramatic mod — it's a whisper of intentionality.
Add to Cart
Use code 22GET20 for 20% off any 2 items
✓ 30-Day Money-Back Guarantee
✓ Worldwide Shipping via DHL, FedEx, UPS
✓ 4.9/5 Stars from 12,300+ reviews
📞 +44 203 943 9919 Mon–Fri 9am–7pm
Victorious Automotive is an independent accessory manufacturer and retailer. We are not affiliated with, endorsed by, or connected to BMW AG, BMW of North America, Jaguar Land Rover, or any official BMW subsidiary. All vehicle names, logos, and trademarks are the property of their respective manufacturers. Product descriptions and compatibility information are provided in good faith; always verify fitment with your vehicle's documentation or contact our support team before purchase.


BMW X3/X4 2018-2021 Climate Control Screen Enhancement Kit
£ 256.49
Victorious · BMW X3/X4 · Interior Upgrades
BMW X3/X4 Climate Control Screen Enhancement Kit – 2018–2021 G01/G02
Premium 8.8-inch capacitive touchscreen upgrade with integrated climate, seat control, and advanced voice recognition for seamless cabin management.
BMW G01/G02
2018–2021
Plug-and-Play
Android OS
Voice Control
IPS Touch
Overview
The BMW X3 (G01) and X4 (G02) are precision-engineered luxury SUVs, and their cabins deserve equally refined control interfaces. This Climate Control Screen Enhancement Kit elevates the standard HVAC and radio display into a modern, intuitive touchscreen ecosystem—without altering your vehicle's original architecture.
The 8.8-inch IPS capacitive display replaces the factory climate unit with a responsive, high-resolution interface (1280×800) running Android OS. Full functionality includes air conditioning, seat heating, seat ventilation, and radio controls, all accessible via smooth touch gestures or multi-language voice commands. The system is tested for reliability and backed by a 12-month warranty.
Installation is straightforward: USB connection with simple plug-and-play deployment means minimal disruption to your interior. Whether you're upgrading for everyday convenience or seeking a modern touch to match contemporary cabin expectations, this kit delivers both form and function.
What's Included
🖥️
Climate & Radio Control Screen
8.8" IPS capacitive display, 1280×800 resolution
📖
Installation Guide
Step-by-step wiring and placement instructions
🔌
Cables & Connectors
USB integration cables and all necessary adapters
⚙️
Pre-Tested Unit
Factory QA certified for seamless performance
Product Highlights
8.8-inch IPS capacitive touchscreen with 1280×800 resolution
Android operating system with multi-language voice control
Plug-and-play USB connection—no modifications required
Full climate control: refrigeration, heating, and fan speed
Seat heating and ventilation status display and control
Customizable themes and interface layouts
Direct replacement for factory climate unit
12-month manufacturer's warranty included
Thoroughly tested for durability and reliability
Compatible with X3M and X4M performance variants
Compatibility
Model
Generation
Year Range
Status
BMW X3
G01
2018–2021
Direct Fit
BMW X4
G02
2018–2021
Direct Fit
BMW X3M
G01
2018–2021
Direct Fit
BMW X4M
G02
2018–2021
Direct Fit
BMW X3 (Pre-2018)
F25
2010–2017
Not Compatible
BMW X4 (Pre-2018)
F26
2014–2017
Not Compatible
Installation
Installation Difficulty: Moderate | Time: 30–45 minutes
Power down: Switch off the ignition and allow systems to fully reset (2–3 minutes).
Remove trim: Carefully unclip the factory climate control bezel from the dashboard (refer to guide for trim locations).
Disconnect factory unit: Unplug the original climate display connector and remove securing screws.
Install new screen: Position the new 8.8-inch unit into the opening, align flush with the dashboard, and secure with provided fasteners.
Connect USB & power: Plug the USB cable into the vehicle's existing USB port or auxiliary power point; plug the connector into the new screen.
Reinstall trim: Snap the bezel back into place around the new display.
Test all functions: Restart the vehicle and verify climate control, seat heating/ventilation, radio controls, and voice commands.
Professional Installation Recommended: While this kit is designed for DIY installation, we recommend professional fitment to ensure optimal integration with your vehicle's electrical systems and to preserve any existing warranties. Victorious partners offer installation services—contact us for details.
Why Choose This Kit
Your BMW X3 or X4 deserves controls that match its engineering calibre. This Climate Control Screen Enhancement Kit modernises your cabin without compromise: responsive touchscreen technology, intuitive voice commands in multiple languages, and seamless integration with heating, cooling, and seat comfort systems. The 12-month warranty and thorough factory testing mean you're investing in a proven upgrade, not an experiment.
Whether upgrading an aging interface or adding modern convenience to a newer model, this kit delivers measurable improvement to daily driving experience.
Ready to Upgrade Your X3 or X4?
Experience the difference a premium control interface makes. Order your Climate Control Screen Enhancement Kit today and transform your cabin into a modern, responsive driving environment.
Add to Cart
Use code 22GET20 for 20% off when you buy any 2 items.
⭐ 4.9/5 stars · 12,300+ reviews
✓ 30-day money-back guarantee
🌍 Worldwide shipping via DHL, FedEx, UPS
📞 +44 203 943 9919 · Mon–Fri 9am–7pm
Victorious Automotive is not affiliated with, endorsed by, or connected to BMW AG, Bayerische Motoren Werke, or any subsidiaries. All product names, logos, and brands are the property of their respective owners. This product is designed for aftermarket enhancement and is sold as-is for enthusiast use. Always verify vehicle compatibility before purchase and follow local regulations regarding vehicle modifications.
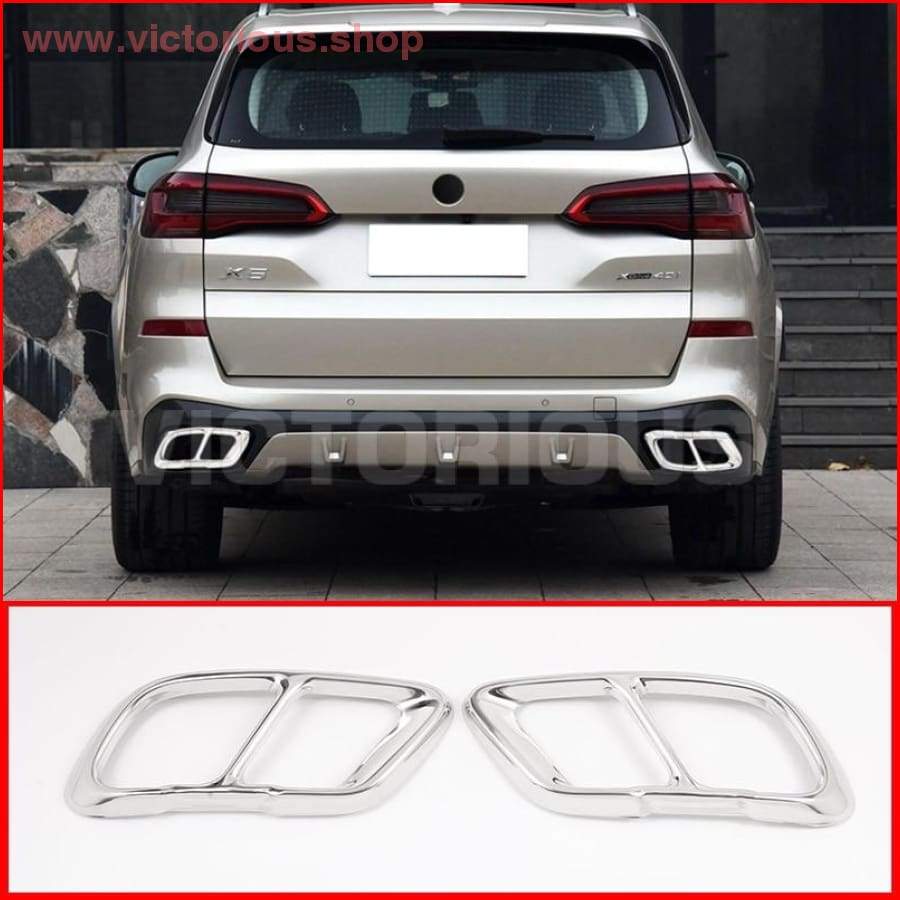
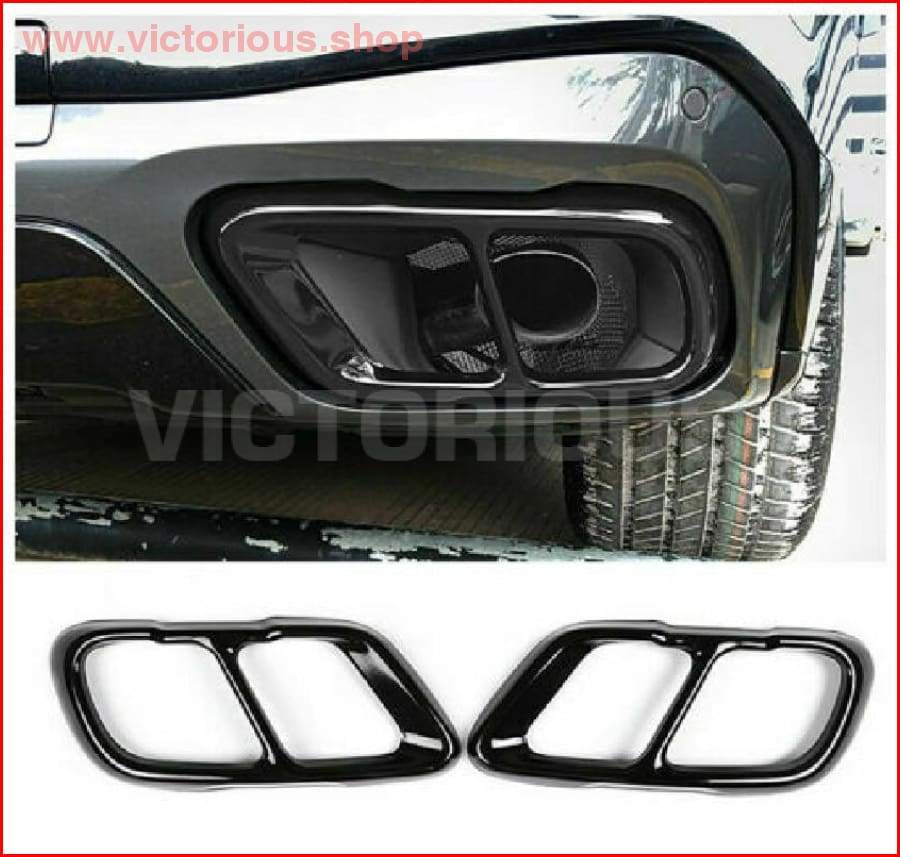
BMW X5 G05 & X7 G07 Quad Exhaust Muffler Pipe Trim Upgrade (2019-2023)
£ 32.30
BMW · X5 G05 & X7 G07 · Exhaust Trim
Quad Exhaust Muffler Pipe Trim Upgrade – BMW X5 G05 & X7 G07 (2019–2023)
Premium stainless steel quad exhaust trim that transforms your BMW's rear aesthetic with aggressive, high-performance styling.
G05 / G07
2019–2023
Stainless Steel
Quad Exhaust
Easy Install
ISO9001 Certified
Overview
The BMW X5 G05 and X7 G07 are precision-engineered luxury SUVs that command attention on any road. This quad exhaust muffler pipe trim upgrade elevates their rear profile, adding a layer of sportiness and visual aggression that rivals factory M-sport packages.
Crafted from premium grade stainless steel, this two-piece trim set mirrors the exhaust architecture of higher-specification BMW models, delivering that coveted dual-quad outlet aesthetic. Whether you choose the refined shiny silver or bold high-gloss black finish, the result is an understated yet purposeful enhancement that catches light and eyes alike.
Installation is straightforward thanks to included high-quality adhesive tape—no drilling, welding, or permanent modifications required. Perfect for owners who want tangible visual impact without compromise to originality.
What's Included
✓
2-Piece Exhaust Trim Set
One complete quad outlet solution
🔧
High-Grade Adhesive Tape
Professional-strength automotive grade
📋
Installation Instructions
Step-by-step guidance included
🛡️
30-Day Money-Back Guarantee
Full refund if not satisfied
Product Highlights
Precision-engineered quad exhaust aesthetic for 2019–2023 X5 G05 & X7 G07
Grade-A stainless steel resists corrosion and maintains factory-fresh finish
Available in shiny silver and high-gloss black—choose your statement
ISO9001 certified manufacturing ensures quality and durability
Adhesive tape installation—reversible, no permanent modifications
Lightweight at 500g per set—zero impact on handling or performance
Dimensions optimised: 35cm length × 17cm width × 5cm height
Mirrors OEM M-sport styling for premium visual upgrade
Heat-bond ready—improved adhesion when tape is pre-warmed
Turn-key solution that elevates rear-end presence instantly
Compatibility
Vehicle Model
Year Range
Status
BMW X5 G05
2019–2023
Direct Fit
BMW X7 G07
2019–2023
Direct Fit
BMW X5 G05 (Prior Gen)
Pre-2019
Not Compatible
BMW X7 G07 (Prior Gen)
Pre-2019
Not Compatible
Installation & Care
Difficulty: Beginner | Time: 15–20 minutes
Clean the rear bumper area thoroughly with mild soap and water. Allow to dry completely (15–20 minutes minimum).
Lightly sand the adhesive area on the exhaust trim backing with 180–220 grit sandpaper for improved bond.
Gently warm the included adhesive tape using a heat gun or hair dryer on medium setting for 10–15 seconds to improve tackiness.
Carefully align the trim pieces around your exhaust outlets, ensuring both are centred and level before final adhesion.
Press firmly onto the bumper for 30 seconds per piece, then allow 24 hours for full cure before exposing to moisture.
For removal, gently prise up a corner and carefully peel back—residue can be cleaned with rubbing alcohol.
Note: Do not apply tape to wet, dusty, or cold bumpers. Optimal adhesion occurs between 15–25°C. Avoid car washes for 48 hours post-installation.
Complete Your BMW Transformation
Small details define great cars. This quad exhaust trim upgrade is one such detail—understated, purposeful, and undeniably effective. Order now with confidence backed by our 30-day guarantee.
Shop Exhaust Trims
Use code 22GET20 for 20% off any 2 items.
⭐ 4.9/5 from 12,300+ reviews
🚚 Worldwide shipping via DHL, FedEx, UPS, TNT
📞 +44 203 943 9919 (Mon–Fri 9am–7pm)
Disclaimer: Victorious Automotive is not affiliated with, endorsed by, or connected to BMW AG, Bayerische Motoren Werke, or any official BMW entity. All product names, logos, and trademarks are the property of their respective owners. This product is an aftermarket accessory designed for fitment to the specified vehicle models. Always verify compatibility with your vehicle's specific year and build configuration before purchase.


BMW X5/X6 E70/E71 2008-2013 Carbon Fiber Style Interior Trim Frame Cover Sticker
from £ 42.74
BMW · X5 / X6 E70/E71 · Interior Trim
BMW X5/X6 E70/E71 Carbon Fiber Style Interior Trim Frame Cover Sticker
Elevate your cabin with premium carbon fiber aesthetics and effortless adhesive installation.
E70 / E71
2008–2013
Carbon Fiber ABS
Pre-Adhesive
Plug & Play
Overview
For BMW X5 (E70) and X6 (E71) owners, interior detail matters. This carbon fiber style trim transforms your cabin with a contemporary, premium finish that rivals OEM upgrades—without the price tag or permanent modifications.
Precision-engineered in high-grade ABS plastic with a realistic carbon weave texture, this interior molding strip applies directly to existing trim panels. Pre-applied adhesive eliminates the mess and guesswork of loose tape. Installation takes minutes, and removal leaves no residue if you ever want to revert.
Whether refreshing an aging cabin or personalising a newly acquired example, this trim captures the modern aesthetic that late-model BMW owners demand. Durable, lightweight, and designed specifically for E70/E71 geometry—no universal fitment compromises here.
What's Included
🎨
Carbon Fiber Trim Strip
Pre-adhesive ABS molding, direct fit
🧼
Alcohol Prep Wipe
Surface prep for optimal adhesion
📋
Fitment Guide
Step-by-step installation diagram
✓
Quality Assurance
Tested for E70/E71 fit and finish
Product Highlights
Realistic carbon fiber weave texture — not flat, not cheap-looking
E70/E71-specific design — engineered for exact panel geometry
Pre-applied double-sided adhesive — no loose tape, no mess
High-grade ABS material — rigid, impact-resistant, long-lasting
Lightweight construction — adds zero weight to your cabin
UV-stable finish — resists fading in direct sunlight
Clean removal option — reusable adhesive doesn't damage trim
Modern aesthetic — transforms dated interiors instantly
2008–2013 coverage — complete E-generation compatibility
Pair with other upgrades — complements steering wheel trim, door handles
Compatibility & Fitment
Model
Generation
Year Range
Fitment
BMW X5
E70
2008–2013
Direct Fit
BMW X6
E71
2008–2013
Direct Fit
BMW X5
F15
2014+
Not Compatible
BMW X6
F16
2014+
Not Compatible
Installation Notes
Difficulty Level: Easy • Time Required: 10–15 minutes
Prepare the surface: Clean the target trim panel with the included alcohol wipe. Allow to dry completely (2–3 minutes). Remove any loose dust or debris.
Test fit: Dry-fit the carbon fiber trim to confirm position and alignment with surrounding panels.
Peel backing: Carefully peel the white backing from the pre-applied adhesive. Work slowly to avoid creasing.
Apply with pressure: Press the trim firmly onto the cleaned surface, starting from one end and working to the opposite end. Use medium, even pressure across the entire strip.
Set for 24 hours: Do not disturb the trim for at least 24 hours, allowing the adhesive to cure fully.
Final inspection: Check all edges for proper seating. Trim any excess with a sharp hobby knife if needed.
⚠️ Important: Ensure your cabin temperature is between 15–25°C during installation. Cold surfaces reduce adhesive effectiveness. Do not apply over existing protective film or wax-treated surfaces.
Ready to Upgrade Your X5/X6 Interior?
Transform your E70/E71 cabin with modern carbon fiber styling. Premium finish, effortless installation, and backed by our 30-day money-back guarantee.
Shop Carbon Fiber Trim Now
Use code 22GET20 for 20% off any 2 items
⭐ 4.9/5 from 12,300+ reviews
🚚 Worldwide shipping via DHL, FedEx, UPS
📞 Expert support: +44 203 943 9919
✓ 30-day money-back guarantee
Victorious Automotive is an independent aftermarket accessory specialist. We are not affiliated with BMW AG, Bayerische Motoren Werke, or any official BMW subsidiary. All product names and vehicle designations are used for compatibility and reference only. BMW is a registered trademark of its respective owner.


Body Logo Decoration For Toyota Land Cruiser 250 2024 2025 Prado LC250 1958 First Edition
£ 52.24
Victorious Automotive · Toyota Land Cruiser LC250 · Exterior Badging
Body Logo Decoration for Toyota Land Cruiser 250 Prado LC250 – 1958 First Edition Style (2024–2025)
Elevate the exterior presence of your LC250 with precision-crafted body lettering and logo decoration finished in silver or gold — a subtle upgrade that makes an unmistakable statement.
LC250
Land Cruiser 250
Prado
2024 – 2025
ABS Material
Silver & Gold Finish
Adhesive Fit
1958 First Edition
Exterior Badging
No Drilling
Overview
The Toyota Land Cruiser 250 — known globally as the Prado LC250 — represents a return to form for the nameplate: rugged capability wrapped in a more refined, modern silhouette. It's a vehicle with genuine heritage, and the 1958 First Edition trim pays direct homage to the original Land Cruiser lineage that made this name legendary. Owners who choose the LC250 aren't just buying a vehicle — they're investing in a statement of purpose and provenance.
This body logo decoration set has been designed specifically for the 2024 and 2025 LC250 to complement that heritage narrative. The lettering and logo pieces are precision-moulded from durable ABS and finished in either polished silver or warm gold to integrate naturally with the vehicle's existing trim lines. Available in a 1958 First Edition configuration, these pieces draw a visual thread between the modern LC250 and the vehicle that started it all over six decades ago.
Installation requires no drilling, no cutting, and no professional fitting — a quality 3M-style adhesive backing bonds firmly to the bodywork and holds securely through all weather conditions. Whether you're adding a touch of distinction to a daily driver or refining a show-ready build, this is one of the cleanest exterior upgrades available for the LC250 platform.
What's Included
🔠
Body Logo Decoration Set
1 x full set of body lettering and logo pieces for the LC250
🔧
Pre-Applied Adhesive
3M-style adhesive backing pre-installed on each piece
📋
Installation Guide
Step-by-step fitting reference included in packaging
Product Highlights
Precision-moulded ABS construction for durability and exact fit
Available in polished silver or warm gold finish options
Designed specifically for the 2024–2025 Toyota LC250 Prado platform
1958 First Edition styling pays homage to the original Land Cruiser lineage
No-drill adhesive installation — preserves factory bodywork integrity
Weather-resistant finish — UV stable and moisture resistant
Enhances exterior grade and visual distinction without modification
Trim-matched design integrates with existing LC250 body lines
Lightweight construction — no added load or stress on bodywork
Reversible installation — removable without damaging factory paint
Compatibility
Model
Code
Year Range
Fit
Toyota Land Cruiser 250 Prado
LC250
2024 – 2025
Direct Fit
Toyota Land Cruiser 250 – 1958 First Edition
LC250
2024 – 2025
Direct Fit
Toyota Land Cruiser 300 Series
LC300
2021 – 2025
Not Compatible
Toyota Land Cruiser 200 Series
LC200
2007 – 2021
Not Compatible
Toyota Land Cruiser Prado 150 Series
LC150
2009 – 2023
Not Compatible
Installation Notes
🛠 Difficulty: Easy · ⏱ Estimated Time: 20–40 Minutes · 👤 No Professional Required
Thoroughly clean the target area on the vehicle bodywork using an isopropyl alcohol wipe. Ensure the surface is completely free of wax, polish, grease, and moisture before proceeding.
Dry fit each piece against the bodywork to confirm position and alignment. Use masking tape as a guide line if needed to ensure straight, even placement.
Peel the protective backing from the adhesive on the first piece. Do not touch the adhesive surface with bare fingers.
Press firmly into position starting from one end, applying steady even pressure along the full length of each piece for a minimum of 30 seconds.
Repeat for each remaining piece, checking alignment against adjacent pieces before pressing down permanently.
Allow a minimum of 24 hours before exposing the vehicle to water, rain, or a car wash. This curing period ensures a permanent bond.
⚠ Important: Installation should be performed at an ambient temperature above 15°C (59°F). Cold bodywork significantly reduces adhesive bonding strength. Do not attempt installation in direct sunlight or on a hot vehicle surface as this may cause premature adhesive activation and misalignment.
Upgrade Your LC250 Today
Join over 12,300 enthusiasts who trust Victorious Automotive to deliver premium exterior upgrades — backed by a 30-day money-back guarantee and worldwide DHL, FedEx, UPS, and TNT shipping.
Shop All LC250 Exterior Accessories
Use code 22GET20 for 20% off any 2 items
⭐ 4.9/5 Stars – 12,300+ Reviews
🌍 Worldwide Shipping – DHL, FedEx, UPS, TNT
🔄 30-Day Money-Back Guarantee
📞 +44 203 943 9919 – Mon–Fri, 9am–7pm
Victorious Automotive is an independent aftermarket accessories retailer. This product is not manufactured by, affiliated with, endorsed by, or approved by Toyota Motor Corporation or any of its subsidiaries. All vehicle names, model codes, and trademarks referenced are used solely for the purpose of fitment identification and remain the property of their respective owners.


Body Side Skirt Guard Fit for Jetour Traveller T2 2023-2025 5/7-seater
£ 133.91
Asian Motors · Jetour Traveller T2 · Body Protection
Body Side Skirt Guard for Jetour Traveller T2 2023–2025
Premium black side skirt protection for 5 and 7-seater models—engineered to safeguard your vehicle's vulnerable side panels from everyday impacts and parking lot scuffs.
Jetour Traveller T2
2023–2025
5-Seater & 7-Seater
Black Knight Edition
Direct Fit
Overview
The Jetour Traveller T2 has quickly established itself as a capable mid-size SUV for families and adventure seekers alike. Over its lifecycle—particularly across the 2023–2025 generation—owners invest significantly in their vehicles' longevity and appearance. Yet the body sides remain one of the most exposed areas during parking, urban navigation, and off-road exploration.
This Body Side Skirt Guard is engineered as a straightforward but essential defence against stone chips, parking lot contact, and minor impacts that can quickly devalue your Traveller T2's resale appeal. The Black Knight design complements both 5-seater and 7-seater configurations with a refined, integrated aesthetic that doesn't dominate the vehicle's profile.
Direct-fit engineering means zero modifications to your vehicle; installation is straightforward, reversible, and factory-safe. Whether you drive in urban environments or tackle rougher terrain, this guard absorbs the punishment your original paintwork shouldn't have to.
What's Included
🛡️
Side Skirt Guards (Pair)
One for each side, pre-formed black polymer
🔩
Fastening Hardware
Stainless steel clips & fixings included
📋
Installation Guide
Step-by-step instructions with diagrams
🧹
Prep & Clean Kit
Surface preparation materials for secure fit
Product Highlights
Black Knight finish—premium aesthetic, integrated design language
Direct-fit engineering for 2023–2025 Traveller T2 all configurations
OEM-grade black polymer—UV resistant, doesn't fade or crack
Guards against stone chips, curb contact, minor impacts, and weathering
Reversible installation—no permanent modifications to your vehicle
Stainless steel fasteners—corrosion-proof in all climates
Compatible with both 5-seater and 7-seater body styles
Factory-safe—does not void warranty or require modifications
Straightforward DIY or professional installation—under 30 minutes
Protects resale value by preserving original side panel paintwork
Compatibility Table
Model
Generation
Configuration
Status
Jetour Traveller T2
2023–2025
5-Seater
Direct Fit
Jetour Traveller T2
2023–2025
7-Seater
Direct Fit
Jetour Traveller T2
2022 & Earlier
All
Not Compatible
Other Jetour Models
All
All
Not Compatible
Note: If you're unsure about your specific model year or configuration, contact us at +44 203 943 9919 (Mon–Fri, 9am–7pm GMT). Our team will verify compatibility before you purchase.
Installation Notes
Difficulty Level: Beginner | Time: 20–30 minutes
Prepare the surface: Clean both sides of your Traveller T2 with the included prep kit. Remove any dirt, wax, or debris from the skirt area where the guard will mount.
Position the guard: Align the left-side guard flush against the body skirt, ensuring even spacing from wheel arch to rear quarter panel.
Mark attachment points: Use the pre-drilled holes as a guide. Mark positions lightly with a pen if desired.
Attach fasteners: Insert stainless steel clips and secure firmly but not over-tightened. Test with gentle hand pressure before final tightening.
Repeat for right side: Mirror the process on the opposite side. Ensure both guards are level and symmetrical.
Final check: Walk around your vehicle. Guards should sit flush and level with no gaps or protrusions.
⚠️ Important: Do not over-tighten fasteners, as this may distort the polymer guard or damage underlying trim. Hand-tight plus a quarter-turn is sufficient.
Protect Your Traveller T2 Today
Your Jetour Traveller T2 deserves protection that's as capable as it is. Don't let parking lots and everyday hazards chip away at your investment. Order your Black Knight Side Skirt Guard now and drive with confidence.
Shop Jetour Accessories
Use code 22GET20 to save 20% when you purchase any 2 items from our Jetour collection.
4.9★ from 12,300+ verified reviews
30-day money-back guarantee
Worldwide shipping via DHL, FedEx, UPS
Questions? Ring us: +44 203 943 9919 (Mon–Fri, 9am–7pm GMT)
Victorious Automotive is an independent accessory specialist and is not affiliated with, endorsed by, or connected to Jetour Automobile or Chery Automobile Group. All vehicle names, logos, and trademarks remain the property of their respective manufacturers. Product fitment is based on technical specifications; we recommend confirming compatibility with our team before purchase. Installation is the responsibility of the end user; professional installation is advised if you are unsure.


Bonnet Anti-theft Switch w/ Sensor for Land Rover Freelander 2 Discovery 4 5 Range Rover Sport 10-14 Evoque Sport Velar LR065340
£ 52.35
SPECIFICATIONSBrand Name: PartsmostCondition: NewFitment Type: Direct ReplacementHigh-concerned chemical: noneModel Number: LR054331 LR041431OEM NO.: LR065340 LR125366Origin: Mainland ChinaPlacement on Vehicle: FrontWarranty: 6 months
New Bonnet Hood Lock Switch With Sensor for Land Rover Freelander 2 / Discovery 4 / Range Rover Sport 2010-2013 / Range Rover Evoque 2012- / Range Rover Sport 2014- / Discovery Sport / All
New Discovery / Range Rover Velar
Anti-theft Alarm Latch sensor
OE NO.: LR041431 LR065340
PRODUCT DESCRIPTION:
1) OEM Quality or aftermarket parts with excellent quality.
2) According to the original equipment specifications.
3) Perfect match with the original car.
4) Easy and fast installation.
5) Stable performance and high reliability.
ITEM TYPE:
Hood Lock Switch With Sensor
PART NUMBERS:
LR125366
LR065340
LR054331
LR041431
COMPATABILITY:
FOR LAND ROVER FREELANDER LR2
FOR LAND ROVER DISCOVERY LR4
FOR LAND ROVER RANGE ROVER SPORT 2010-2013
FOR LAND ROVER RANGE ROVER EVOQUE 2012-
FOR LAND ROVER RANGE ROVER SPORT 2014-
FOR LAND ROVER DISCOVERY SPORT 2015-
FOR LAND ROVER ALL NEW DISCOVERY 2017-
FOR LAND ROVER RANGE ROVER VELAR 2017-
PACKAGE INCLUDED:
1 x Hood Lock Switch With Sensor
PRODUCT PHOTOS:
Please note the packing box and the stickers might be improved by the manufacturer, but the photos might not be updated at the same time. We only guarantee the product quality is the same.
If you find that the product images are the same as ours but without our brand logo "Partsmost", it means that other merchants have stolen our product images. Please note that if you purchase from other merchants, you will bear the risks.
Aftermarket brand:
SKETCH MAP:
Technical Data
Will this item fit your vehicle?
- Before purchasing, please pay attention to item Technical Data and check Part Numbers. Make sure that one of these part numbers does coincide with the number of your previous part or does replace your Original Equipment Number.
- Surely, in case you doubt in fitment, cannot find the number of your previous part listed in Part Numbers section, or just cannot be sure about item compatibility with your vehicle, please send us your VIN number (Vehicle Identification Number) which is on your Vehicle Registration Certificate or the lower left corner of the front windshield. We are here to assist you to check.
- Let's avoid compatibility issues, returns, and get great shopping experience ever!
Payment Method
- You can see all payment methods available and choose the one you prefer.
- If you cannot find the payment method you prefer, please contact us to get more information.
- We offer combined packages shipping discount. If you purchase more than one item or in big quantity of some items, please feel free to ask us before you make payment how to save shipping cost for you.
Shipping Method & Delivery Time
- We usually use Standard shipping method or Simple shipping method to send goods by Free Shipping. If you have a special requirement, please contact us before you purchase. Tracking numbers will be available to be checked at www.17track.net after the packages have been shipped out.
Seller's shipping method to Brazil usually refers to "Correios Brazil" and the tracking number can be checked. Delivery time is about 25 days to 45 days.
- We can also use Express shipping method like e-EMS, EMS, DHL, FedEx, UPS to send goods if you need urgently, but please note that you may need to pay import duty and taxes based on the Customs policy of your country. Our selling price does NOT include any Customs charges and local charges!
- If you do not want to pay import duties, please contact us, and we will check if there are any duty-free shipping methods are available to your country.
NOTE:
- In some remote countries like Bosnia and Herzegovina, Bolivia, Dominican Republic, South Africa etc., buyers usually can get goods within 60 natural days, but if severe Custom Invesigation happens, delivery time may extend to 100 natural days.
- China Post is slower than other standard post shipping method and sometimes its delivery time is longer than 60 days, so we do NOT recommend it if you have not patience to wait for that long time. Please do NOT open any disputes for the reason of "goods still in delivery" if you choose China Post.
Returns
- Customers may return an item for refund or exchange within 10 days after the item is received. If return is for any quality problems, we pay return charges. If return is NOT for any quality problems, the buyer should pay return charges. Moreover, items must be returned in their original shipping method and intact packaging is required. Otherwise, you might not get full refund.
- If the package is returned to us for the reason as below, the buyer need to pay for return charges if it occurs and CANNOT get a refund of the freight paid for the order.
1. After the parcel arrives at the destination country, the buyer's address, phone number, zip code is not clear and the buyer cannot be contacted;
2. The buyer did not sign and receive the package in time;
3. The buyer refused to receive the package;
4. The buyer refused to pay import duty and taxes.
About us
- We are a professional seller of auto spare parts for British and European car models located in China for more than 10 years, the biggest producing country. With the good quality products we have, we do competitive offer, professional service to customers all over the world.
- We choose the suitable shipping way for every country those we ship to. Usually we ship out goods within 2 working days, sometimes within 3 working days during the promotion period. We give satisfy solution to any problems we meet.
- We also do business of original parts and OEM brand parts to provide more alternatives for our customers. If you are also interested in them, just feel free to get a quotation from us.
- We welcome wholesale orders and we can ship goods by sea, please contact us for more information.
Feedbacks
- Once we have received your order, a positive feedback will be automatically sent to you. Please let us to know if you have not received our feedback, we will give feedback manually.
- We would also greatly appreciate if you leave us a positive feedback with 5 stars rating.
- If you feel that we deserve a neutral or negative feedback, please, CONTACT US before leaving any feedback, give us a chance to make things right and leave your impression most positive!


Bonnet Cover decorationFor 2021-2024 Toyota Land Cruiser 300 LC300
£ 119.69
Victorious Automotive · Toyota Land Cruiser LC300 · Exterior Styling
Bonnet Cover Decoration – Toyota Land Cruiser 300 LC300 (2021–2024)
A precision-fitted ABS bonnet cover trim that sharpens the LC300's commanding front profile with a purposeful, rugged aesthetic — no cutting, no drilling, no compromise.
LC300
2021–2024
ABS Material
Exterior Styling
Bonnet Trim
Direct Fit
Adhesive Install
Rugged Design
Overview
The Toyota Land Cruiser 300 is one of the most capable and respected SUVs ever produced — a machine built for serious terrain, long expeditions, and a lifetime of dependable performance. Its presence on and off road commands attention, and owners rightly demand accessories that match that standard. This bonnet cover decoration is designed with exactly that expectation in mind.
Engineered as a custom-fit trim piece for the 2021–2024 LC300, this bonnet cover decoration slots precisely into the contours of the vehicle's hood line. Manufactured from high-grade ABS thermoplastic, the piece delivers a rugged, tactical aesthetic that complements the LC300's bold factory styling without looking afterthought or ill-fitting. Whether you're building out a functional overland setup or simply refining the exterior trim, this piece adds a layer of visual distinction that's immediately noticeable.
The adhesive-based installation system eliminates any requirement for drilling or panel modification, keeping your vehicle's bodywork fully intact. Included special automotive-grade car glue ensures a firm, weather-resistant bond from day one — making this a weekend-friendly upgrade that delivers a long-term result.
What's Included
🛡️
Bonnet Cover Decoration
1x custom-fit ABS trim piece for LC300 2021–2024
🔧
Special Car Glue
Automotive-grade adhesive for secure, clean fitment
Product Highlights
Precision-engineered custom fit for the 2021–2024 Toyota Land Cruiser 300
Constructed from high-grade ABS thermoplastic for lasting durability
Enhances the LC300's rugged, commanding front-end profile
Adhesive-only installation — no drilling or panel modification required
Automotive-grade car glue included for a firm, weather-resistant bond
Resistant to UV fading, road vibration and seasonal temperature variation
Adds a purposeful, sporty aesthetic in keeping with the LC300's character
Lightweight construction — no impact on bonnet operation or balance
Compatible with all LC300 trim levels produced between 2021 and 2024
No wiring, sensors or electrical components affected during fitment
Compatibility
Vehicle
Code
Year Range
Fitment
Toyota Land Cruiser 300
LC300
2021–2024
Direct Fit
Toyota Land Cruiser 250
LC250
2024+
Not Compatible
Toyota Land Cruiser 200
LC200
2008–2021
Not Compatible
Toyota Land Cruiser Prado
J150
All Years
Not Compatible
Installation Notes
🛠 Difficulty: Easy · ⏱ Estimated Time: 20–40 Minutes · 🔩 Tools Required: None
Thoroughly clean the bonnet surface where the trim will be applied. Use an isopropyl alcohol wipe to remove any wax, grease or residue and allow to dry completely.
Dry-fit the bonnet cover decoration against the hood to confirm alignment and positioning before applying any adhesive.
Apply the included automotive-grade car glue evenly along the underside contact points of the trim piece, following the manufacturer's instructions on the adhesive.
Carefully press the trim into position, applying firm and even pressure along its entire length for 30–60 seconds to initiate the bond.
Allow the adhesive to cure fully — ideally 24 hours — before exposing the vehicle to water, rain, or a car wash.
⚠ Note: Do not install in temperatures below 10°C (50°F) as adhesive performance may be reduced. Ensure the bonnet surface is completely dry before application. Due to the size of this product, some shipping methods may be unavailable — please contact our team at +44 203 943 9919 if you require assistance selecting a suitable shipping option.
Explore the Full LC300 Collection
Browse our complete range of exterior upgrades, interior enhancements, and functional accessories designed exclusively for the Toyota Land Cruiser LC300 — all rigorously curated for owners who expect more.
Shop LC300 Accessories
Use code 22GET20 for 20% off any 2 items
⭐ 4.9/5 from 12,300+ verified reviews
📦 Worldwide Shipping via DHL, FedEx, UPS & TNT
↩️ 30-Day Money-Back Guarantee
📞 Mon–Fri 9am–7pm · +44 203 943 9919
Victorious Automotive is an independent aftermarket accessories retailer. This product is not manufactured by, endorsed by, or affiliated with Toyota Motor Corporation or any of its subsidiaries. All vehicle names, model designations and codes are used for compatibility reference purposes only. Always verify fitment against your specific vehicle configuration prior to purchase.


Bonnet Struts Hydraulic For 2024 Toyota Land Cruiser 250
£ 52.01
Victorious Automotive · Toyota Land Cruiser LC250 · Exterior
Hydraulic Bonnet Struts for 2024 Toyota Land Cruiser 250 (LC250 / Prado)
Purpose-engineered hydraulic gas struts that replace your standard bonnet prop rod — giving the 2024 Land Cruiser 250 a hands-free, effortless bonnet lift every time.
LC250
2024
Hydraulic Gas Struts
Direct Fit
Black Finish
Exterior Upgrade
No Drilling Required
Pair Included
Overview
The 2024 Toyota Land Cruiser 250 — known internationally as the Prado LC250 — is a generation-defining SUV built on Toyota's new TNGA-F platform. Refined, capable, and increasingly popular with serious off-road enthusiasts and daily driver alike, the LC250 deserves accessories that match its engineering ethos. Every detail counts, and that includes what happens every time you open the bonnet.
These hydraulic bonnet struts are designed exclusively for the 2024 Land Cruiser 250 and replace the factory prop rod with a pair of precision gas-charged struts that hold the bonnet open automatically. Once fitted, the bonnet rises smoothly and stays firmly elevated without any manual support — whether you're checking fluids in a supermarket car park or diagnosing something on a remote trail. It's a small modification with an outsized impact on how premium your LC250 feels to interact with every single day.
Finished in satin black and built from durable steel and high-grade polymer end caps, these struts are engineered to withstand the thermal cycling, dust, and vibration that come with daily driving and occasional off-road use. The direct-fit mounting points align precisely with the existing factory brackets on the LC250 bonnet — no fabrication, no drilling, and no permanent modification to your vehicle.
What's Included
🔩
Hydraulic Bonnet Struts × 2
One matched pair — left and right sides
🛠️
Installation Hardware
All mounting clips and fasteners included
📋
Installation Guide
Step-by-step fitting instructions
Product Highlights
Engineered specifically for the 2024 Toyota Land Cruiser 250 (LC250 / Prado)
Hands-free bonnet operation — no prop rod required
High-pressure gas-charged hydraulic mechanism for smooth, controlled lift
Direct-fit to OEM factory mounting brackets — zero drilling
Satin black finish complements the LC250's exterior styling
Durable steel construction with heat and corrosion-resistant coating
Secure hold at full extension — no bonnet drift or sag
Reversible installation — original prop rod system unaffected
Rated for repeated thermal cycling in all climate conditions
Sold as a matched pair with all required installation hardware
Compatibility
Vehicle
Year
Variant
Fitment
Toyota Land Cruiser 250 (Prado)
2024
All Grades (GX, VX, Kakadu, etc.)
Direct Fit
Toyota Land Cruiser 250 (Prado)
2025
All Grades
Direct Fit
Toyota Land Cruiser 300
2022–2025
All Variants
Not Compatible
Toyota Land Cruiser 200
2008–2021
All Variants
Not Compatible
Toyota Land Cruiser 120 (Prado)
2002–2009
All Variants
Not Compatible
Toyota Land Cruiser 150 (Prado)
2009–2023
All Variants
Not Compatible
Installation Notes
🔧 Difficulty: Easy · ⏱ Estimated Time: 20–35 Minutes · 👤 1 Person Required
Open the bonnet fully and secure it using the existing factory prop rod before you begin work.
Locate the two OEM bonnet strut mounting points on both the bonnet frame and the engine bay body rail — one on each side.
Clip the lower end of each hydraulic strut onto the body-side mounting ball pin. Ensure the clip locks firmly into place with an audible click.
Carefully lower the bonnet to the half-open position, then clip the upper end of each strut onto the bonnet-side ball pin. Again, confirm a secure, clicked connection.
Remove the factory prop rod and stow it safely in the engine bay in case it is needed in the future.
Test the bonnet by opening and closing it several times. The struts should hold the bonnet fully open with no assistance and allow controlled, smooth lowering when closing.
⚠ Important: Always verify the struts are fully clipped and locked onto both ball pins before removing the prop rod. Do not force the bonnet closed if you feel resistance — check all connections first. If you are unsure at any stage, professional installation is recommended. Contact our team on +44 203 943 9919 (Mon–Fri, 9am–7pm) for guidance.
Explore the Full LC250 Collection
These bonnet struts are just the beginning. Browse our complete range of exterior upgrades, interior accessories, and off-road enhancements built specifically for the Toyota Land Cruiser 250.
Shop All LC250 Accessories
Use code 22GET20 for 20% off any 2 items
⭐ 4.9/5 from 12,300+ verified reviews
🚚 Worldwide Shipping via DHL, FedEx, UPS & TNT
↩ 30-Day Money-Back Guarantee
📞 +44 203 943 9919 Mon–Fri, 9am–7pm
Victorious Automotive is an independent aftermarket accessories retailer. We are not affiliated with, endorsed by, or connected to Toyota Motor Corporation or any of its subsidiaries. Toyota, Land Cruiser, Prado, and LC250 are registered trademarks of Toyota Motor Corporation. All product references are used for fitment and compatibility identification purposes only. Please verify compatibility with your specific vehicle before purchase.

Boot / Trunk/Cargo Rubber Mat for Jaecoo J7
£ 62.70
Victorious Automotive · Jaecoo J7 · Interior Protection
Boot / Trunk / Cargo Rubber Mat for Jaecoo J7
Premium heavy-duty rubber protection for your J7's cargo area — waterproof, anti-slip, and custom-fitted for flawless OEM integration.
Jaecoo J7
Heavy-Duty Rubber
Waterproof
Anti-Slip
Custom Fit
Overview
The Jaecoo J7 demands interior protection that matches its capability. This purpose-engineered Boot / Trunk / Cargo Rubber Mat safeguards your J7's rear cargo area from the daily realities of adventure ownership — mud, spills, pet claws, luggage abrasion, and seasonal weather.
Built from premium heavy-duty rubber compound, this mat delivers durable all-weather defence without compromising the clean, factory aesthetic your J7 deserves. The anti-slip surface keeps cargo stable during dynamic driving, while the waterproof construction makes cleanup effortless. Whether you're loading shopping, transporting pets, carrying expedition gear, or managing seasonal debris, this mat works silently in the background to preserve your original carpeting.
Custom-fitted to your J7's boot dimensions, the mat simply drops in place—no drilling, no modifications, no compromise. It's the uncompromising choice for owners who refuse to sacrifice interior integrity for practical protection.
What's Included
🛡️
Cargo Rubber Mat
Heavy-duty construction, Jaecoo J7 specific fit
Product Highlights
Custom-fitted to Jaecoo J7 boot dimensions
Heavy-duty rubber compound for durability
Waterproof and stain-resistant surface
Anti-slip texture for cargo security
Protects original carpet from wear and damage
Easy to remove and clean with water
OEM-style appearance and fitment
Suitable for all seasons and weather
No tools or modifications required
Ideal for families, pets, travel, and outdoor use
Compatibility
Vehicle
Model Years
Fitment
Jaecoo J7
2024–Present
Direct Fit
Note: Please confirm your vehicle year and specification before purchasing. Colours and texture may vary slightly between production batches.
Installation
Difficulty: Beginner | Time: 2 minutes
Open your Jaecoo J7 boot and clear the cargo area.
Position the mat to align with the boot floor edges and contours.
Drop the mat into place — it will settle naturally into the boot shape.
Smooth out any wrinkles or uneven sections by hand.
Test the fit by gently lifting one corner to confirm secure seating.
Note: No adhesive, fasteners, or modifications are needed. The mat's weight and rubber grip hold it securely in place during normal driving.
Care & Maintenance
To maintain your cargo mat, simply rinse with clean water and dry with a soft cloth. For stubborn stains, use a mild soap solution. The rubber compound is resistant to salt, UV exposure, and temperature extremes — making it ideal for year-round use. Remove and air-dry seasonally to prevent moisture buildup.
Protect Your J7's Interior Today
The cargo area is where real use happens. Don't let mud, spills, and scratches compromise the interior your J7 deserves. Order your custom-fitted Boot Rubber Mat now and drive with confidence.
Shop Jaecoo J7 Accessories
Use code 22GET20 for 20% off any 2 items
✓ 30-day money-back guarantee
✓ 4.9/5 stars from 12,300+ reviews
✓ Worldwide shipping via DHL, FedEx, UPS
✓ UK support: +44 203 943 9919
Disclaimer: Victorious Automotive is not affiliated with Jaecoo, Chery Automotive, or their parent companies. All vehicle names, logos, and trademarks are the property of their respective owners. This product is designed for compatibility and is not an OEM part. Please verify fitment before purchase.


Boot trunk switch carbon trim for Rover Range Rover Vogue L460 2023 2024
£ 24.69
Victorious Automotive · Range Rover Vogue L460 · Interior Trim
Boot Trunk Switch Carbon Trim — Range Rover Vogue L460 (2023–2024)
A precision-crafted ABS carbon fibre finish trim that upgrades your L460's boot switch panel with a sharp, consistent look that complements the Vogue's signature interior language.
Range Rover Vogue L460
2023–2024
Carbon Fibre Finish
ABS Material
Direct Fit
Interior Trim
Boot Trunk Switch
No Drilling
Overview
The Range Rover Vogue L460 sets a new benchmark for modern luxury SUVs. Its cabin is a carefully considered space — every surface, material, and detail curated to create a sense of calm refinement. For owners who want to take that experience one step further, precision interior trim upgrades offer a meaningful and lasting way to personalise the vehicle without compromising its factory character.
This boot trunk switch carbon trim is engineered specifically for the 2023 and 2024 model year Range Rover Vogue L460. It fits directly over the existing boot switch surround panel, replacing the standard finish with a high-quality carbon fibre effect that integrates naturally with the darker tones and technical aesthetic common across the L460's interior trim palette.
Constructed from durable ABS with a carbon fibre appearance finish, this trim resists everyday scratching and surface wear far better than standard factory plastics — particularly in a high-contact area like the boot switch. The result is a cleaner, more refined rear interior that holds its appearance over time and makes an impression every time the boot is opened.
What's Included
🪄
Boot Trunk Switch Carbon Trim
1 piece — carbon fibre effect ABS finish
📦
Protective Packaging
Brand new, boxed and ready to fit
🔧
Adhesive Backing
Pre-applied for clean, tool-free fitment
Product Highlights
Precision-moulded ABS construction for a tight, factory-quality fit on the L460 boot switch panel
Carbon fibre effect finish that complements dark interior trims and gloss accents throughout the Vogue cabin
Scratch and abrasion resistant surface — engineered to maintain appearance in a high-use area
No drilling, cutting, or permanent modifications required — fully reversible upgrade
Pre-applied adhesive backing for a clean, professional installation without additional tools
100% brand new and boxed — never refurbished or remanufactured
Lightweight and low-profile — adds zero bulk to the original panel geometry
UV-stable finish prevents fading or discolouration from natural interior light exposure
Designed to pair seamlessly with other L460 carbon interior trim upgrades from Victorious
Ships worldwide via tracked courier — DHL, FedEx, UPS and TNT available at checkout
Compatibility
Model
Code
Years
Fitment
Range Rover Vogue
L460
2023–2024
Direct Fit
Range Rover Vogue
L460
2022
Verify Before Purchase
Range Rover Sport
L461
2022–2024
Not Compatible
Range Rover Vogue
L405
2013–2021
Not Compatible
Range Rover Sport
L494
2013–2022
Not Compatible
Range Rover Defender
L663
2020–2024
Not Compatible
Range Rover Velar
L560
2018–2022
Not Compatible
Installation Notes
Difficulty: Easy · Estimated Time: 10–15 minutes · Tools Required: None
Open the boot of your Range Rover Vogue L460 fully and locate the existing boot trunk switch panel surround.
Clean the surface of the factory panel thoroughly using an isopropyl alcohol wipe, removing any dust, grease, or fingerprints. Allow to dry completely before proceeding.
Remove the protective backing from the adhesive on the carbon trim piece and dry-fit it against the panel first to confirm alignment and positioning.
Once satisfied with the alignment, press the trim firmly into place from the centre outward, applying even pressure across the entire surface for 30–60 seconds to ensure a secure bond.
Allow the adhesive to cure for a minimum of 24 hours before operating the boot switch repeatedly or exposing the vehicle to water.
⚠ Note: Installation instructions are not included in the package. If you are unsure about any step, we recommend consulting a professional installer. Ensure your vehicle model year is confirmed before fitting. This trim is designed for the L460 2023–2024 specifically — fitting on an incompatible variant may result in poor alignment or adhesive failure.
Upgrade Your L460 Interior Today
Every detail counts in the Range Rover Vogue. This boot trunk switch carbon trim is a small change that makes an immediate, lasting impression — and it's backed by our 30-day money-back guarantee and 4.9-star rated service.
Shop All L460 Interior Upgrades
Use code 22GET20 for 20% off any 2 items
⭐ 4.9/5 from 12,300+ verified reviews
🔄 30-Day money-back guarantee
✈️ Worldwide shipping via DHL, FedEx, UPS & TNT
📞 +44 203 943 9919 Mon–Fri, 9am–7pm
Victorious Automotive is an independent aftermarket accessories retailer. We are not affiliated with, authorised by, or in any way connected to Jaguar Land Rover Limited (JLR), Land Rover, or any of their subsidiaries. All brand names, vehicle codes, and model references are used solely for fitment identification purposes. All trademarks remain the property of their respective owners.


Bumper Light LED Dynamic Light For 2021+ Toyota Land Cruiser 300 Lc300
£ 106.39
Victorious Automotive · Toyota Land Cruiser LC300 · Exterior Lighting
LED Dynamic Bumper Light – Toyota Land Cruiser 300 (LC300) 2021–2024
A precision-fit dynamic LED bumper light for the LC300, delivering sequential turn signals, integrated brake illumination, and enhanced low-visibility driving presence — without cutting a single factory wire.
LC300
2021–2024
Dynamic LED
Sequential Turn Signal
Plug-In Fit
Bumper Exterior
Fog & Rain Ready
OEM Buckle Mount
Overview
The Toyota Land Cruiser 300 Series is one of the most capable and commanding SUVs ever produced — a vehicle built for those who demand genuine performance both on and off the road. From the Sahara to Scandinavia, the LC300 has earned its reputation through decades of engineering excellence. Owners of this platform understand that every detail matters, and that form and function are not mutually exclusive.
This LED Dynamic Bumper Light has been engineered specifically for the 2021–2024 Land Cruiser 300, slotting directly into the factory bumper housing using the original OEM buckle and screw positions. There is no cutting, no splicing of looms, and no permanent modification to your vehicle. The four-wire harness — negative, daytime running, brake, and turn signal — connects cleanly to your existing system and activates each function with the precision you would expect from a factory-grade component.
Whether you are navigating a fog-laden mountain pass, reversing in low light, or simply want your LC300 to carry a stronger visual presence on-road, this bumper light delivers on every front. The sequential dynamic indicator draws attention exactly where it is needed most, while the all-on brake activation ensures maximum stopping visibility in adverse conditions. It is a subtle upgrade with a significant real-world impact.
What's Included
💡
LED Dynamic Bumper Light (Pair)
Left & right units, direct fit for LC300 bumper housing
🔌
4-Wire Harness
Pre-wired connections for DRL, brake, turn signal, and ground
🔩
OEM-Style Mounting Hardware
Buckle clips and screws matching factory fitment
📄
Installation Guide
Step-by-step wiring and fitment instructions
Product Highlights
Dynamic sequential turn signal for increased road presence and visibility
Full light activation during braking — every LED illuminates simultaneously
Static daytime running light mode for continuous low-level presence
Dynamic hazard light function for enhanced emergency warning
Direct OEM buckle and screw fitment — no drilling or cutting required
Durable LED lamp beads with long operational lifespan
Improved visibility in fog, rain, and low-light conditions
Plug-and-play wiring via colour-coded four-wire connector
Precision-matched to LC300 bumper aperture for a factory-finished look
Compatible with all trim levels of the 2021–2024 Land Cruiser 300
Compatibility
Vehicle
Code
Year Range
Fitment
Toyota Land Cruiser 300
LC300 / J300
2021 – 2024
Direct Fit
Toyota Land Cruiser 200
LC200 / J200
2007 – 2021
Not Compatible
Toyota Land Cruiser 250
LC250
2024+
Not Compatible
Toyota Land Cruiser Prado
J150 / J250
All
Not Compatible
Toyota Sequoia / Tundra
–
All
Not Compatible
Installation Notes
Difficulty: Intermediate · Estimated Time: 45–75 Minutes · Tools Required: Panel trim tool, Phillips screwdriver
Ensure the vehicle ignition is off and the battery is disconnected before beginning any wiring work.
Using a trim removal tool, carefully unclip the existing lower bumper light surround or blank cover from the factory housing to expose the mounting aperture.
Route the four-wire harness through the bumper to the vehicle's wiring loom, ensuring adequate slack without tension.
Connect each wire using the colour-coded guide: Black → Negative/Ground · White → Daytime Running Light · Red → Brake · Yellow → Turn Signal.
Seat the LED unit into the bumper aperture and secure using the supplied OEM-style buckle clips, followed by the retention screw.
Reconnect the battery and test all functions — DRL, turn signal (sequential), brake activation, and hazard — before closing up.
Repeat the process for the opposite side. Ensure both units are flush and symmetrical before final tightening.
⚠ Important: Incorrect wire connections may result in lighting malfunction or electrical faults. Always verify wire colours on your specific vehicle harness against the guide provided. If in doubt, consult a qualified auto electrician. Do not operate the lights with the battery disconnected during testing.
Upgrade Your LC300 with Confidence
At Victorious Automotive, every product in our Toyota Land Cruiser LC300 range is selected for fit, finish, and real-world performance. This bumper light is one of the most impactful visual and functional upgrades you can make to your 300 Series — clean, purposeful, and built to last.
Shop All LC300 Accessories
Use code 22GET20 for 20% off any 2 items
⭐ 4.9/5 from 12,300+ verified reviews
🚚 Worldwide Shipping via DHL, FedEx & UPS
↩ 30-Day Money-Back Guarantee
📞 +44 203 943 9919 Mon–Fri 9am–7pm
Victorious Automotive is an independent aftermarket accessory retailer. This product is not manufactured by, affiliated with, or endorsed by Toyota Motor Corporation or any of its subsidiaries. Toyota, Land Cruiser, and LC300 are registered trademarks of Toyota Motor Corporation. All trademarks are the property of their respective owners and are referenced solely for vehicle compatibility purposes.


C-Pillar Air Conditioning Outlet Frame Trim in Chrome and Oak Wood Grain for 2020 Land Rover Defender 110
£ 23.74
Victorious Automotive · Defender L663 · Interior Trim
C-Pillar Air Conditioning Outlet Frame Trim — Chrome & Oak Wood Grain for Land Rover Defender 110 (2020–2026, L663)
A precision-cut ABS trim panel finished in chrome-edged oak wood grain, designed to elevate the C-pillar air vent surround of the Defender 110 with a refined, factory-integrated look.
Defender L663
2020–2026
110 Wheelbase
High-Quality ABS
Chrome & Oak Wood Grain
C-Pillar Vent Trim
Peel & Stick Install
No Drilling Required
Overview
The Land Rover Defender 110 L663 redefined what a modern Defender could be — blending serious off-road capability with a surprisingly premium interior. Yet even from the factory, there are elements of the cabin that invite personalisation, and the C-pillar air conditioning vent surrounds are one of the most overlooked opportunities to add genuine character to the space.
This C-Pillar Air Conditioning Outlet Frame Trim is engineered to sit flush over the existing vent surround with zero modifications required. Crafted from high-grade ABS and finished in a chrome-bordered oak wood grain, it introduces a warm, sophisticated contrast to the Defender's characteristically utilitarian interior language — whether your cabin is in Ebony, Acorn, or any other standard colour scheme.
The result is an upgrade that looks like it was considered at the design stage, not added as an afterthought. For Defender owners who want their 110 to feel as considered inside as it is capable outside, this trim piece is a low-effort, high-impact starting point.
What's Included
🪵
C-Pillar AC Outlet Frame Trim
1 × chrome and oak wood grain finish panel, pre-cut for L663 Defender 110
🔧
Pre-Applied Adhesive Backing
Industrial-grade 3M-style tape pre-installed on the rear face for a secure bond
📄
Installation Guide
Step-by-step fitting instructions included in the package
Product Highlights
Precision-cut ABS construction for an exact fit on the Defender 110 L663 C-pillar vent surround
Chrome border detailing frames the oak wood grain face for a layered, premium aesthetic
100% brand new — not a refurbished or aftermarket-recycled component
Pre-applied adhesive backing ensures a strong, lasting bond with no drilling or cutting
Slim profile sits flush with the surrounding trim panels for an OEM-style appearance
ABS material is resistant to temperature fluctuations, UV exposure, and everyday interior wear
Compatible with all standard Defender 110 L663 interior colour configurations
Reversible upgrade — can be removed carefully without damaging the factory surface underneath
Complements other wood grain or chrome interior trim accessories for a cohesive cabin upgrade
Lightweight construction adds no meaningful weight to the vehicle
Compatibility
Model
Code
Year Range
Fit
Defender 110
L663
2020–2026
Direct Fit
Defender 90
L663
2020–2026
Verify Before Purchase
Defender 130
L663
2022–2026
Verify Before Purchase
Range Rover Sport
L461 / L494
All Years
Not Compatible
Range Rover Vogue
L460 / L405
All Years
Not Compatible
Range Rover Velar
L560
All Years
Not Compatible
Installation Notes
🛠 Difficulty: Easy | ⏱ Estimated Time: 10–15 Minutes | 🔩 Tools Required: None
Before fitting, ensure the C-pillar air vent surround area is thoroughly cleaned. Use an isopropyl alcohol wipe to degrease the surface and remove any dust, oils, or residue. Allow to dry completely before proceeding.
Dry-fit the trim piece over the vent surround to confirm alignment and positioning before committing to adhesion. The panel should sit flush with the surrounding surfaces — adjust the placement as needed.
Peel the protective backing from the adhesive layer carefully, avoiding contact with the adhesive face.
Press the trim firmly into position, applying even pressure across the entire panel for at least 30–60 seconds to activate the adhesive bond.
Run a fingertip or soft cloth around the edges to ensure full contact and eliminate any air gaps along the perimeter.
Allow the adhesive to cure undisturbed for a minimum of 72 hours before exposing the area to moisture, cleaning products, or extreme temperature changes.
⚠ Cold Weather Note: If fitting in temperatures below 10°C, gently warm the adhesive backing and the mounting surface with a hairdryer on a low setting for 20–30 seconds prior to application. This significantly improves initial tack and long-term adhesion strength.
Explore the Full Defender 110 Interior Collection
This trim is just the beginning. Browse our complete range of Defender L663 interior upgrades — from dashboard panels and gear surround trims to door handle covers and ambient lighting enhancements — all curated specifically for the 2020–2026 Defender 110.
Shop Defender 110 Accessories
Use code 22GET20 for 20% off any 2 items
⭐ 4.9/5 Stars — 12,300+ Verified Reviews
📦 Worldwide Shipping via DHL, FedEx, UPS & TNT
↩ 30-Day Money-Back Guarantee
📞 +44 203 943 9919 Mon–Fri, 9am–7pm
Victorious Automotive is an independent aftermarket accessory retailer. This product is not manufactured by, affiliated with, endorsed by, or approved by Land Rover, Jaguar Land Rover Limited (JLR), or any of their subsidiaries. All vehicle names, model codes, and trademarks referenced are the property of their respective owners and are used solely for fitment identification purposes. Please verify compatibility with your specific vehicle configuration prior to purchase.


Cadillac Escalade (2008-2012) Full interior android navigation upgrade
£ 759.99
Cadillac · Escalade (2008–2012) · Android Navigation Upgrade
Cadillac Escalade (2008–2012) Full Interior Android Navigation Upgrade — 13.6″ 1080p Touchscreen
A complete factory-replacement infotainment system purpose-built for the 2008–2012 Cadillac Escalade — delivering Android 11, wired CarPlay, high-resolution navigation, and 4K media playback in a seamless, OEM-grade fitment.
2008–2012 Escalade
Android 11
13.6″ 1080p
CarPlay
Android Auto
4GB RAM / 64GB
GT6 CPU
Direct Fit
GPS Navigation
Bluetooth 5.0
Overview
The Cadillac Escalade has always occupied a unique position in the full-size luxury SUV segment — bold, commanding, and uncompromising in its presence. But the infotainment systems fitted to the 2008–2012 generation were designed for a different era, and they show their age in a world now defined by seamless connectivity, real-time navigation, and high-resolution displays. If your Escalade still deserves to command attention — inside as well as out — this upgrade is the answer.
This Android Navigation Upgrade replaces your factory head unit with a purpose-engineered 13.6-inch 1920×1080 touchscreen system running Android 11. Powered by a high-performance GT6 CPU paired with 4GB of DDR3 RAM and 64GB of onboard Nand Flash storage, the system handles everything from live map routing to 4K video playback without hesitation. The result is an interior that looks and performs like a modern flagship — without modifying the vehicle's core architecture.
Designed specifically for the GMT900-platform Escalade, the unit slots into the factory dash with no cutting, no custom fabrication, and no compromise to the vehicle's original wiring. Wired Apple CarPlay, Android Auto, Bluetooth 5.0, and dual-zone audio support ensure that whether you're commuting or covering serious distance, the cabin keeps pace with every demand you place on it.
What's Included
🖥️
13.6″ Android Head Unit
1920×1080 IPS touchscreen, Android 11
🔌
Vehicle-Specific Wiring Harness
Plug-and-play, no splicing required
📡
GPS Antenna
High-sensitivity external aerial
🎙️
External Microphone
For hands-free calling clarity
🔧
Mounting Brackets & Hardware
OEM-profile fitment for GMT900 dash
📖
Installation Guide
Step-by-step with wiring diagrams
Product Highlights
13.6-inch IPS display with 1920×1080 full HD resolution and 10-point multi-touch
Android 11 OS — fast, stable, and compatible with the full Google Play ecosystem
GT6 high-performance CPU for fluid navigation, video, and multitasking
4GB DDR3 RAM ensures seamless app switching with zero lag
64GB Nand Flash onboard storage for maps, media, and applications
Wired Apple CarPlay and Android Auto integration via USB
Bluetooth 5.0 for audio streaming and hands-free calling
Built-in GPS with offline and online map compatibility
Dual USB ports plus SD card slot for expanded media access
Retains factory steering wheel controls and reverse camera input
Compatibility
Vehicle
Year Range
Trim / Notes
Fitment
Cadillac Escalade
2008–2012
Base, Luxury, Premium, Platinum
Direct Fit
Cadillac Escalade ESV
2008–2012
Extended wheelbase variants
Direct Fit
Cadillac Escalade EXT
2008–2012
Crew cab / sport-back
Direct Fit
Cadillac Escalade (GMT900)
2007
Confirm factory head unit dimension
Verify First
Cadillac Escalade (GMTK2)
2013–2014
Different dash architecture
Not Compatible
Installation Notes
Difficulty: Intermediate · Estimated Time: 1.5–2.5 Hours
Disconnect the negative battery terminal and allow the vehicle's capacitors to discharge for at least 60 seconds before beginning.
Remove the factory centre console trim panel using a plastic trim removal tool — start from the lower edges and work upward to avoid cracking the surround.
Unplug the factory head unit's wiring connectors and antenna lead, then slide the unit free from its mounting cage.
Connect the included vehicle-specific wiring harness to your Escalade's factory plugs — each connector is keyed and labelled; no splicing is required.
Route the GPS antenna to the top of the dashboard (ideally near the windscreen base) for optimal satellite acquisition.
Mount the external microphone discreetly above the driver's sun visor or on the A-pillar for clear hands-free performance.
Slide the new head unit into the mounting bracket, connect all harnesses, and test all functions before re-fitting the trim panel.
Restore the battery connection, power on the system, and complete the initial Android setup and GPS calibration.
⚠ Important: Always verify that your specific Escalade's factory head unit opening matches the dimensions of this unit before installation. If your vehicle has a factory Bose audio system, confirm amplifier integration compatibility. When in doubt, consult a qualified automotive electrician or contact us on +44 203 943 9919 before proceeding.
Upgrade Your Escalade's Interior Today
The 2008–2012 Cadillac Escalade was built to impress. This Android navigation upgrade ensures the interior lives up to that reputation — modern, connected, and refined. Join over 12,300 satisfied customers who've chosen Victorious for their vehicle upgrades.
Shop Cadillac Upgrades
Use code 22GET20 for 20% off any 2 items
⭐ 4.9/5 from 12,300+ verified reviews
🚚 Worldwide Shipping via DHL, FedEx & UPS
↩️ 30-Day Money-Back Guarantee
📞 Expert Support Mon–Fri, 9am–7pm
Victorious Automotive is an independent aftermarket accessories retailer. This product is not manufactured by, affiliated with, or endorsed by Cadillac, General Motors, or any of their subsidiaries. All vehicle names, model designations, and trademarks are the property of their respective owners and are referenced solely for fitment identification purposes. Installation should be carried out by a qualified technician where required. Always verify compatibility with your specific vehicle configuration prior to purchase.


CAM COVER INLET MANIFOLD FOR LAND ROVER DISCOVERY MK4 RANGE ROVER SPORT VELAR JAGUAR 3.0 VALVE COVER LR105956 LR105957 LR116732
£ 198.78
```html
Victorious · Engine Bay · Valve Cover
Cam Cover Inlet Manifold Valve Cover – 3.0 Diesel Engine
OE-specification valve cover assembly with integrated gasket for Land Rover and Jaguar 3.0-litre diesel powerplants. Direct replacement, perfect fitment.
Discovery MK4 / LR4
Range Rover Sport L494
Range Rover Vogue L405
Range Rover Velar L560
Jaguar XF / XJ
3.0 TDV6 / TDV8
2009–2022
With Gasket
Overview
The valve cover seals the top of your engine's cylinder head, containing oil mist and preventing contaminants from entering the combustion chamber. On Land Rover Discovery MK4, Range Rover Sport, Range Rover Vogue, Range Rover Velar, and Jaguar XF/XJ models equipped with the 3.0-litre TDV6 or TDV8 diesel engine, this critical component endures constant thermal cycling and pressure. Over time, the integrated gasket deteriorates, leading to oil weeping, blue smoke on cold start, and potential contamination of the intake manifold.
This is an exact OEM-specification replacement, available in both left and right bank configurations. The cover includes a fresh gasket pre-installed and is manufactured to British automotive tolerances, ensuring perfect fitment and a reliable seal from day one. No modification, heating, or adjustment required—simply unbolt the old cover and install the new one.
Whether your original cover has developed a chronic leak or you're performing preventative maintenance during a major service, this genuine-quality part restores compression integrity, eliminates oil loss, and returns your engine bay to factory condition. Backed by our 30-day money-back guarantee and installed in seconds.
What's Included
🔧
Valve Cover Assembly
Left or Right bank, cast aluminium
🔩
Integrated Gasket
Pre-installed, silicone compound
📋
Installation Guide
Step-by-step removal & refit
🛡️
Warranty
12 months full coverage
Product Highlights
OEM Specification: Manufactured to factory tolerances and materials
Gasket Included: Pre-installed silicone compound, ready to seal
Left & Right: Separate configurations for each engine bank
3.0 Diesel Only: TDV6 and TDV8 engines, 2009–2022
Direct Fit: No modifications, adapters, or drilling required
Corrosion Resistant: Anodised aluminium, proven durability
Easy Installation: 30 minutes, basic socket set, no special tools
Oil Leak Fix: Eliminates seepage and blue smoke on cold start
Pressure Sealed: Restores engine compression integrity
12-Month Warranty: Full coverage, money-back guarantee included
Compatibility
Vehicle Model
Engine
Years
Part Number
Fit
Land Rover Discovery MK4 (LR4)
3.0 TDV6
2010–2016
LR105956 (L) / LR105957 (R)
Direct Fit
Range Rover Sport L494
3.0 TDV6
2014–2020
LR105956 (L) / LR105957 (R)
Direct Fit
Range Rover Vogue L405
3.0 TDV6 / TDV8
2013–2020
LR105956 (L) / LR105957 (R)
Direct Fit
Range Rover Velar L560
3.0 TDV6
2017–2022
LR116732 (R) / LR105957 (R alt)
Direct Fit
Jaguar XF
3.0 TDV6
2009–2015
C2S52756 (L) / C2S52794 (R)
Direct Fit
Jaguar XF
3.0 TDV6
2016+
C2S52756 (L) / C2S52794 (R)
Direct Fit
Jaguar XJ
3.0 TDV6
2010+
C2S52756 (L) / C2S52794 (R)
Direct Fit
Range Rover Sport L320
3.0 TDV6
2005–2013
LR057379 / LR055000 (alt)
Check Fitment
Note: Verify your part number against your vehicle's service history or contact us with your VIN to confirm compatibility. Left (L) and Right (R) configurations are not interchangeable.
Installation
Difficulty: Beginner | Time: 20–30 Minutes
Disconnect the negative battery terminal to prevent accidental ignition.
Remove the engine cover (if fitted) by unclipping or unscrewing 4–6 fasteners.
Disconnect the breather hose from the old valve cover—note its position or photograph it first.
Unbolt the old cover using a socket set. Typically 6–8 bolts, working from outer edges inward.
Lift off the old cover carefully—it may require gentle tapping with a rubber mallet if stuck.
Clean the gasket sealing surface on the cylinder head with a lint-free cloth and isopropyl alcohol. Allow to dry completely (2–3 minutes).
Position the new cover over the cylinder head, ensuring the breather ports align with the hose connection.
Install bolts hand-tight, working from the centre outward in an X-pattern.
Torque bolts to specification (typically 8–12 Nm / 6–9 ft-lb). Do not over-tighten—this can warp the gasket.
Reconnect the breather hose to the new cover, ensuring it seats firmly.
Reinstall the engine cover and reconnect the battery terminal.
Run the engine for 2–3 minutes and inspect for any oil seepage around the new gasket. Normal condensation is fine; active dripping is not.
⚠️ Important: Do not reuse the old gasket. The silicone compound hardens over time and will not seal again. Always install with the new integrated gasket included in this cover. If the cylinder head surface is damaged, pitted, or warped, consider professional head repair or resurfacing before installing this cover.
Ready to Seal Your Engine Bay?
Stop the oil leaks. Restore compression. Eliminate blue smoke on cold start. This OEM-specification valve cover is the direct solution for your 3.0-litre diesel engine—right part, right price, right now.
Shop Valve Covers Now
Use code 22GET20 for 20% off any 2 items.
30-Day Money Back Guarantee
12-Month Warranty
4.9★ 12,300+ Reviews
+44 203 943 9919 Mon–Fri 9am–7pm
Disclaimer: Victorious Automotive is an independent aftermarket specialist and is not affiliated with, endorsed by, or connected to Jaguar Land Rover Limited, Range Rover, Land Rover, Jaguar, or any OEM brand. All product names, logos, and brands are the property of their respective owners. This product is a direct replacement, manufactured to OEM specification and tested for fitment and durability. Always verify compatibility with your vehicle's VIN before purchase.
```


CAMSHAFT TIMING CHAIN & TENSIONER FOR 2.7 3.0 DIESEL LR3 RANGE ROVER SPORT 05-09 14- NEW DISCOVERY VELAR JAGUAR C2S30215 1316113
from £ 92.70
Victorious · Engine & Drivetrain · OEM Replacement
Camshaft Timing Chain & Tensioner Kit – 2.7/3.0 Diesel
OEM-spec timing chain assembly for Land Rover Discovery, Range Rover Sport, and Jaguar diesel engines — direct fit replacement with 12-month warranty.
LR3 / L320 / L460
2005–2019
2.7L & 3.0L Diesel 24V
OEM Quality
Direct Fit
Engine Part
Overview
If you own a Land Rover Discovery LR3, Range Rover Sport L320, or any of the premium Jaguar models powered by TDV6 diesel engines, the timing chain and tensioner system is critical to your engine's reliability. Over time, the factory tensioner can wear, causing chain slack that leads to rough running, timing errors, and catastrophic engine damage if left unaddressed.
This OEM-specification timing chain kit includes a precision-engineered timing chain and hydraulic tensioner assembly, engineered to the exact tolerances of Land Rover and Jaguar's original equipment. It's a direct bolt-on replacement—no machine work, no guesswork—and restores your engine to factory performance specs.
Whether you're addressing early warning signs (rattling on cold start, check engine lights) or performing planned maintenance on a high-mileage vehicle, this kit ensures your diesel engine runs with the quiet, solid feel you expect from British engineering.
What's Included
⛓️
Timing Chain
Precision roller chain, OEM tolerance
🔧
Hydraulic Tensioner
Spring-loaded assembly, pre-tested
🔩
Tensioner Bolts (×2)
OEM-grade fasteners, torque specs included
📋
Installation Guide
Step-by-step instructions with torque values
Product Highlights
Direct replacement for OEM C2S30215 / 1316113 part numbers
Manufactured to OEM specifications and quality standards
Perfect fitment—no machine work or modifications needed
Hydraulic tensioner maintains optimal chain tension under all RPM conditions
12-month warranty covers all manufacturing defects
Quiet, smooth engine performance after installation
Tested assembly—ready to install, no pre-assembly required
Solves cold-start rattle and timing-related check engine codes
Restores engine performance on high-mileage vehicles
Global shipping available—typically arrives within 15–21 days
Compatibility
Vehicle Model
Year Range
Engine
Fit
Land Rover Discovery 3 (LR3)
2005–2009
2.7L V6 TDV6
Direct Fit
Range Rover Sport L320
2005–2009
2.7L V6 TDV6
Direct Fit
Range Rover Sport L494
2014–2021
3.0L Diesel 24V
Direct Fit
Discovery 5 (L462)
2017–Present
3.0L Diesel 24V
Direct Fit
Range Rover Velar (L560)
2017–2022
3.0L Diesel 24V
Direct Fit
Jaguar XJ (Classic)
2003–2009
2.7L V6 TDV6
Direct Fit
Jaguar XF
2009–2015
2.7L V6 TDV6
Direct Fit
Jaguar XF (Mk2)
2016–Present
3.0L Diesel
Direct Fit
Jaguar XJ (Mk X351)
2010–2019
3.0L Diesel
Direct Fit
Jaguar F-PACE
2016–Present
3.0L Diesel
Direct Fit
Note: Always verify your vehicle's exact OEM part number before purchase. Contact us with your VIN or registration if you're unsure.
Installation
Difficulty Level: Intermediate to Advanced
Estimated Time: 4–6 hours (depends on vehicle model and engine bay access)
Disconnect the negative battery terminal and allow the engine to cool completely.
Remove the timing cover, crankshaft pulley, and associated accessories according to your vehicle's service manual.
Verify crankshaft and camshaft timing marks are correctly aligned before removal.
Remove the old timing chain and tensioner assembly using the correct tools (e.g., chain breaker tool for the old chain).
Inspect the timing gears and sprockets for wear; replace if necessary.
Install the new tensioner assembly first, ensuring the spring is correctly seated.
Thread the new timing chain onto both the crankshaft and camshaft sprockets, maintaining alignment.
Install the tensioner bolts and torque to factory spec (typically 20–25 Nm for Land Rover/Jaguar applications).
Verify chain tension by gently rotating the crankshaft by hand; the chain should move freely with minimal slack.
Rotate the engine twice through its full cycle to settle the tensioner, then recheck tension.
Reinstall the timing cover, crankshaft pulley, and all removed components in reverse order.
Reconnect the battery terminal, start the engine, and listen for any abnormal noise.
⚠️ Important: Timing chain installation requires precise alignment. If you're not comfortable working on your engine's core systems, we strongly recommend having a qualified independent mechanic or Land Rover specialist perform the installation. Incorrect installation can cause severe engine damage.
Ready to Restore Your Engine?
Get this OEM-spec timing chain kit installed and enjoy the quiet, reliable performance your Land Rover or Jaguar deserves. Every kit is tested before dispatch and backed by our 12-month warranty.
Add to Cart
Use code 22GET20 for 20% off this item when you buy any 2 products.
⭐ 4.9/5 from 12,300+ reviews
🚚 Worldwide shipping via DHL, FedEx, UPS
🛡️ 30-day money-back guarantee
📞 Expert support: +44 203 943 9919
Victorious Automotive is an independent aftermarket parts specialist and is not affiliated with Jaguar Land Rover Ltd., Land Rover, Range Rover, Discovery, Jaguar, or any other OEM brand. All part names and vehicle designations are used for compatibility reference only. Product warranty covers manufacturing defects only and does not extend to installation damage or labour costs incurred. Always consult your vehicle's official service manual and OEM technical documentation before installation.


CAMSHAFT TIMING CHAIN & TENSIONER KIT FOR 2.7 3.0 DIESEL LR3 RANGE ROVER SPORT NEW DISCOVERY VELAR JAGUAR XF XJ C2S30215 1316113
from £ 64.54
```html
Victorious · Diesel Engine · Engine Parts
Camshaft Timing Chain & Tensioner Kit for 2.7L & 3.0L Diesel
Direct replacement timing chain assembly with tensioner for Land Rover Discovery, Range Rover Sport, and Jaguar diesel powerplants.
C2S30215 / 1316113
2.7L & 3.0L Diesel
2005–2019
24V DOHC Engines
Direct Fit
Overview
The timing chain is the critical heart of your diesel engine's valve train. This OE-specification replacement kit maintains precise camshaft synchronization on Land Rover Discovery LR3, Range Rover Sport, and Jaguar XF, XJ, and F-Pace models equipped with 2.7L and 3.0L turbodiesel engines. Over time, worn tensioners and stretched chains cause valve timing drift, rough running, increased emissions, and potential engine damage.
This complete assembly restores factory performance and durability. Each kit includes a precision-engineered timing chain, automatic tensioner, and mounting hardware, engineered to OEM specifications and tested for seamless fitment across all compatible applications.
Partsmost brand components meet or exceed OEM quality standards. Installation requires basic mechanical knowledge and removal of the front engine cover—a straightforward job for experienced DIY enthusiasts or professional workshops.
What's Included
⛓️
Timing Chain
Precision-ground links, OEM pitch and length
🔧
Automatic Tensioner
Hydraulic damping, maintains chain load
📌
Mounting Hardware
Grade 8 fasteners, installation screws included
📋
Installation Guide
Torque specs and timing reference diagram
Key Highlights
OEM direct replacement—matches original equipment performance exactly
Turbocharged diesel duty—engineered for boost pressure and shock loads
Automatic tensioner—self-regulating hydraulic damper maintains optimal chain tension
12-month warranty—full protection against defects and manufacturing faults
Precision-hardened steel chain—resists stretching and wear over 100,000+ km
Low-noise design—reduced rattle and harshness compared to worn assemblies
Easy access removal—engine cover removal only—no head gasket work required
OE fasteners included—all bolts, washers, and screws for complete installation
Simultaneous two-bank timing—both camshaft profiles synchronize correctly
Tested fit across LR3, RRS, Discovery, Velar, XF, XJ, and F-Pace platforms
Compatibility & Fitment
Vehicle & Year Range
Engine
Fitment
Land Rover Discovery LR3 (2005–2009)
2.7L V6 Diesel
Direct Fit
Land Rover Range Rover Sport (2005–2009)
2.7L V6 Diesel
Direct Fit
Land Rover Range Rover Sport (2014+)
3.0L Diesel 24V DOHC TC
Direct Fit
Land Rover Discovery (2017+)
3.0L Diesel 24V DOHC TC
Direct Fit
Land Rover Range Rover Velar (2017+)
3.0L Diesel 24V DOHC TC
Direct Fit
Jaguar XJ Classic (2003–2009, G00442–H32732)
2.7L V6 Diesel
Direct Fit
Jaguar XF (2009–2015)
2.7L V6 Diesel
Direct Fit
Jaguar XJ (2010–2019)
3.0L Diesel
Direct Fit
Jaguar XF (2016+)
3.0L Diesel
Direct Fit
Jaguar F-Pace (2016+)
3.0L Diesel
Direct Fit
Part Numbers: C2S30215 · 1316113 (both reference the same assembly)
Installation Guide
Difficulty: Intermediate | Time: 2–4 hours
Disconnect the negative battery terminal and allow the engine to cool completely.
Remove the front engine cover and aux belt assembly to expose the timing chain cover.
Remove the cover fasteners and carefully lift away the timing chain cover—note any gasket material for resealing.
Remove the old chain and tensioner by unbolting the tensioner body and sliding the chain free from the crankshaft and camshaft sprockets.
Clean the mounting surfaces with solvent to remove residual oil and gasket material.
Install the new automatic tensioner into its bore, leaving it unbolted initially to allow free movement during chain installation.
Thread the new timing chain onto both the crankshaft and camshaft sprockets, ensuring alignment marks line up (typically marked with white or yellow paint).
Torque the tensioner bolts to 25–30 Nm (18–22 ft-lbs) once the chain is seated and properly tensioned.
Reinstall the timing cover with a new gasket, torque fasteners to 10–15 Nm (7–11 ft-lbs).
Reattach the aux belt, cover, and battery terminal. Start the engine and listen for any chain rattle; it should be silent within 2–3 seconds of startup.
⚠ Critical: Timing marks must align exactly. Misalignment causes misfiring, rough idle, and potential valve collision. If uncertain, consult a professional technician or factory service manual for your specific model year.
Why Victorious?
Premium Parts. Expert Support. 30-Day Guarantee.
We specialise in Land Rover, Range Rover, and Jaguar diesel engine components. Every part is tested for fitment, backed by our 30-day money-back guarantee, and supported by our technical team six days a week.
Shop Engine Parts
Use code 22GET20 for 20% off any 2 items.
4.9★ 12,300+ verified reviews
🌍 Worldwide shipping via DHL, FedEx, UPS
📞 +44 203 943 9919 Mon–Fri 9am–7pm
Victorious Automotive is not affiliated with, endorsed by, or licensed by Jaguar Land Rover Limited, Range Rover, Land Rover, or any subsidiary. All vehicle names, trademarks, and part numbers are the property of their respective manufacturers and are used herein for identification and compatibility purposes only. This product is an aftermarket replacement component meeting OEM specification standards.
```


Canbus For Audi A3 8L 8V 8P A4 B5 B6 B7 B8 A5 A6 C5 C6 C7 A7 A8 D2 D3 Q5 Q7 Vehicle LED Interior Dome Map Light Kit
from £ 25.64
Audi · Interior · LED Lighting
Canbus LED Interior Light Kit – Audi A3 A4 A5 A6 A7 A8 Q5 Q7
Error-free canbus LED interior lighting for all modern Audi models—superbright, plug-and-play, lifetime guaranteed.
Canbus Compatible
Error-Free
LED Technology
Easy Install
50,000h Lifespan
The Kit That Transforms Your Audi's Interior
Whether you drive an A3, A4, A5, A6, A7, A8, Q5, or Q7, the interior lighting sets the tone for the cabin experience. Factory dome lights are dim, yellowish, and feel dated. They're also the first thing passengers notice when you open a door or climb in for a night drive.
This Canbus LED interior kit replaces every interior bulb—map lights, dome lights, vanity mirrors, trunk, and glove box—with premium white LEDs. Each bulb is engineered for direct compatibility with your Audi's factory wiring and CAN bus system. No error codes. No flickering. No ECU warnings. Just brilliant, modern illumination that transforms your cabin instantly.
The kit includes everything you need and varies by model—from 9 pieces on newer A3 8V models to 20 pieces on the flagship Q7 4L. Installation takes less than an hour with basic tools, and the included metal clips ensure a perfect fit every time.
What's Included in Your Kit
💡
Front Dome/Map Lights
3–4 pieces per model
💡
Rear Dome/Map Lights
2–5 pieces per model
🪞
Vanity Mirror Lights
2–4 pieces per model
🔦
Trunk/Cargo Lights
1–5 pieces per model
📦
Glove Box Light
1–2 pieces per model
🔧
Installation Tool
Pry tool for safe removal
Note: Exact quantities vary by model and generation. See the compatibility table below for your specific fitment.
Why This Kit Works
100% Canbus Error-Free – Zero ECU warnings or dashboard alerts
Super Bright & Modern – Clean white light, 50,000-hour lifespan
Direct Fit Bulbs – Twist-in and festoon styles, both included where needed
Plug-and-Play – No rewiring, no splicing, no modifications required
Perfect Heat Resistance – Engineered for extended use in enclosed spaces
Low Power Draw – Efficient LED technology saves your battery
Pre-Tested – Each bulb verified before shipment
Fits All Modern Audi Generations – A3 8L/8P/8V, A4 B5/B6/B7/B8, and more
Includes Installation Guide – Step-by-step instructions with metal clips for security
Premium Build Quality – Lifetime reliability backed by 4.9/5-star reviews
Model-Specific Fitment & Package Contents
Audi Model & Code
Piece Count
Compatibility
A3 / S3 / RS3 (8L)
13 pieces
Direct Fit
A3 / S3 / RS3 (8P)
12 pieces
Direct Fit
A3 / S3 / RS3 (8V)
9 pieces
Direct Fit
A4 / S4 / RS4 (B5)
12 pieces
Direct Fit
A4 / S4 / RS4 (B6/B7)
12 pieces
Direct Fit
A4 / S4 / RS4 (B8)
12 pieces
Direct Fit
A5 / S5 / RS5 (8T)
12 pieces
Direct Fit
A6 / S6 / RS6 (C5)
14 pieces
Direct Fit
A6 / S6 / RS6 (C6)
12 pieces
Direct Fit
A6 / S6 / RS6 (C7)
11 pieces
Direct Fit
A7 / S7 / RS7 (4G)
10 pieces
Direct Fit
A8 / S8 (D2)
15 pieces
Direct Fit
A8 / S8 (D3)
14 pieces
Direct Fit
Q5 / SQ5 (All Generations)
14 pieces
Direct Fit
Q7 (4L)
20 pieces
Direct Fit
Important: Some models (notably A3 8P) include both twist-in and festoon-style bulbs to ensure compatibility with factory variations. Confirm your model code before purchase.
Installation Notes
Difficulty Level: Beginner
Most owners complete this kit in 45–60 minutes. No electrical knowledge required.
Power Off & Cool Down: Turn off all interior lights and allow 10 minutes for bulbs to cool completely.
Locate Bulbs: Start with map lights (typically above seats) and work systematically through dome lights, vanity mirrors, trunk, and glove box.
Remove Old Bulbs: Gently twist counterclockwise or pull straight out, depending on style. Be careful—they may still be warm.
Install LED Bulbs: Insert the new LED bulb and twist clockwise (or push in for festoon-style). Test before moving to the next location.
Secure Metal Clips: For festoon bulbs, slide the included metal clip closer to tighten the bulb in its socket and prevent looseness.
Verify All Lights: Turn on all interior lights and verify that every bulb illuminates without flickering or error codes.
⚠ Safety Note: Do not force bulbs or clips. If a bulb is difficult to remove, gently warm the socket with a heat gun on low setting. If you encounter any error messages on the dashboard after installation, double-check that each bulb is fully seated in its socket.
Ready to Brighten Your Audi's Interior?
Premium canbus LED lighting is one of the most noticeable interior upgrades you can make—and the easiest to install yourself. Transform your cabin from tired to modern in under an hour.
Select Your Audi Model
Use code 22GET20 for 20% off any 2 items.
⭐ 4.9/5 Stars – 12,300+ verified reviews
🚗 Ships Worldwide – DHL, FedEx, UPS, TNT
✅ 30-Day Guarantee – Money-back guarantee
📞 Expert Support – Mon–Fri, 9am–7pm GMT
Disclaimer: This product is not affiliated with Audi AG, Volkswagen Group, or their subsidiaries. Audi is a registered trademark of its respective owner. This kit is designed as an aftermarket accessory and does not carry any original manufacturer warranty. Always verify your specific model and generation before purchase. If in doubt, contact our team at +44 203 943 9919.


Canbus For Mercedes Benz MB C Class W202 W203 W204 W205 S203 S204 C203 C204 Car LED Interior Dome Lamp Door Light Kit
from £ 27.54
```html
Victorious · Mercedes-Benz · Interior Lighting
Canbus LED Interior Dome & Door Light Kit – Mercedes C Class W202–W205
Complete plug-and-play canbus LED upgrade for all Mercedes-Benz C Class generations. Error-free, 50,000-hour lifespan, installation in minutes.
W202 · W203 · W204 · W205
S203 · S204 · C203 · C204
1993–2019
Canbus-Compatible
No ECU Errors
9–17 Bulbs
Overview
The Mercedes-Benz C Class—from the W202 sedan of the early 1990s through the modern W205—deserves interior lighting that matches its precision engineering. Factory dome, door, and trunk lights yellow with age; modern ownership demands brighter, cleaner illumination.
This canbus LED interior light kit replaces every major internal light point with super-bright, error-free LEDs engineered specifically for your C Class variant. Whether you own a W202 classic, a W203 sport sedan, or a current W205, this kit plug-and-plays directly into original sockets without modifications, triggering no dashboard warnings.
Fifty-thousand-hour lifespan, heat-resistant construction, and power-efficient operation mean you're upgrading once and forgetting about it. Your cabin will feel instantly modern—brighter, whiter, more purposeful.
What's Included
💡
Front Dome/Map Lights
2–3 pieces depending on generation
🚪
Door Lights
2–4 pieces; illuminates entry points
🦶
Footwell Lights
2–4 pieces; modern ambient finish
🧳
Trunk/Boot Lights
1–3 pieces; full cargo visibility
🪞
Vanity Mirror Lights
Available on W203+; sun visor integration
🔧
Installation Tool
Safe removal; included in every kit
Why Canbus LED?
100% Error-Free: No ECU warnings; no dashboard faults
Direct Fit: Plug into original sockets; no wiring or splicing
50,000-Hour Life: Outlasts your vehicle; zero maintenance
Super Bright: White, modern output vs. dim yellow OEM
Power Efficient: Reduced draw; preserves battery
Heat Resistant: Engineered for sealed cabin conditions
Model-Specific: Kits tailored to each generation
Play & Plug: Installation in under 15 minutes
Premium Feel: Transforms cabin ambience instantly
Warranty Protected: Full compatibility guarantee
Compatibility by Generation
C Class Variant
Years
Bulb Count
Status
W202 Sedan
1993–1999
9 pieces
Direct Fit
S202 Estate
1996–2001
12 pieces
Direct Fit
W203 Sedan
2000–2007
12 pieces
Direct Fit
S203 Estate
2002–2007
16 pieces
Direct Fit
C203 Coupe
2001–2007
12 pieces
Direct Fit
W204 Sedan
2008–2014
17 pieces
Direct Fit
S204 Estate
2008–2014
17 pieces
Direct Fit
C204 Coupe
2008–2014
13 pieces
Direct Fit
W205 Sedan
2015–2019
14 pieces
Direct Fit
Installation
Difficulty: Beginner | Time: 10–15 minutes
Turn off all interior lights and ensure the vehicle is parked in a safe location.
Allow any recently used bulbs to cool for 2–3 minutes (original bulbs get hot).
Gently remove the original bulb from its socket using the supplied tool or light pressure.
Insert the new LED bulb into the socket; ensure it's seated fully.
If the bulb feels slightly loose, carefully adjust the metal pin clips closer together to secure it.
Repeat for all bulb locations listed in your kit's package contents.
Turn on cabin lights to verify illumination; adjust brightness as needed.
Safety Note: Always turn off lights before removal. Do not force bulbs; if resistance is encountered, gently wiggle while applying slight rotational pressure. Never touch the LED glass with bare hands; use the included tool or a clean cloth.
Elevate Your C Class Interior
Modern, bright, error-free cabin lighting—installed in minutes. Transform your Mercedes-Benz C Class from dated to deliberately premium with this canbus LED kit.
Add to Cart
Use code 22GET20 for 20% off any 2 items.
4.9★ 12,300+ reviews
30-day money-back guarantee
Worldwide DHL, FedEx, UPS
+44 203 943 9919 Mon–Fri 9am–7pm
Victorious Automotive is not affiliated with, endorsed by, or connected to Mercedes-Benz AG, Daimler-Benz, or any official Mercedes-Benz subsidiary. All vehicle names, logos, and trademarks remain the property of their respective manufacturers. This product is designed for compatibility and aftermarket use only.
```


Car Air Freshener Perfume Diffuser Hanging Glass Bottle
£ 4.74
Victorious Automotive · Discovery Interior · Cabin Accessories
Car Air Freshener Perfume Diffuser — Hanging Glass Bottle for Land Rover & Range Rover Interiors
A refillable, elegantly weighted glass diffuser bottle that transforms the cabin atmosphere of your Land Rover or Range Rover with your choice of fragrance — hanging discreetly from the mirror with minimal effort.
Discovery Interior
Universal Fit
Borosilicate Glass
Refillable
8ml Capacity
Silver / Black / Gold
Essential Oil Compatible
Hanging Mirror Mount
Overview
Every Land Rover and Range Rover owner understands that the interior experience matters as much as what happens beyond the tarmac. From the Defender's purposeful cabin to the Range Rover Vogue's wood-trimmed sanctuary, the environment inside your vehicle is an extension of your standard — and that includes scent. Generic tree-shaped fresheners simply don't belong in that equation.
This hanging glass diffuser bottle is a considered alternative. Compact, transparent, and available in silver, black, or gold finishes to complement your interior hardware, it holds 8ml of your preferred perfume, essential oil, or fragrance blend. The glass construction allows the scent to diffuse naturally and gradually, without aerosol sprays or chemical-laden pads that can feel out of place in premium vehicles.
The 21cm hanging rope suspends the bottle cleanly from your rear-view mirror, keeping it within the cabin airflow where diffusion is most effective. The bottle is fully refillable — simply top it up when the scent fades. It doubles as a subtle decorative ornament that adds character without cluttering the dash or vents. Clean, refined, and entirely at home in a Land Rover cabin.
What's Included
🍶
Glass Diffuser Bottle
8ml capacity, transparent borosilicate glass with metal cap
🪢
Hanging Rope
21cm / 8.27" length — mirror-mount ready
🧴
Refillable Stopper
Secure metal closure to control diffusion rate
Product Highlights
Transparent borosilicate glass — clear, elegant, scratch-resistant
Fully refillable with any perfume, oil blend, or essential oil
Available in Silver, Black, and Gold to match interior trim
8ml bottle capacity — long-lasting fragrance release
21cm rope suspends cleanly from any rear-view mirror stem
No batteries, sprays, or plug-in required — entirely passive
Compact 4.5cm height — unobtrusive in any cabin
Doubles as a decorative ornament for home or office use
Lightweight build — no swing vibration noise when driving
Ideal gift for Land Rover, Range Rover, and Defender owners
Compatibility
Vehicle
Code / Years
Fitment
Range Rover Vogue
L460 · 2022–2026
Universal Fit
Range Rover Vogue
L405 · 2013–2020
Universal Fit
Range Rover Sport
L461 · 2022–2026
Universal Fit
Range Rover Sport
L494 · 2013–2020
Universal Fit
Range Rover Sport
L320 · 2005–2013
Universal Fit
Defender
L663 · 2020–2026
Universal Fit
Land Rover Defender
2004–2016
Universal Fit
Range Rover Velar
2018–2022
Universal Fit
Range Rover Evoque
L551 · 2019–2026
Universal Fit
Range Rover Evoque
L538 · 2011–2018
Universal Fit
Land Rover Discovery 5
L462 · 2017–2026
Universal Fit
Land Rover Discovery 4
L319 · 2009–2016
Universal Fit
Land Rover Discovery 3
L319 · 2004–2009
Universal Fit
Land Rover Discovery Sport
L550 · 2015–2026
Universal Fit
Toyota Land Cruiser
LC250 / LC300
Universal Fit
Mercedes G Class
G-Wagon · All Years
Universal Fit
This product uses a universal mirror-hanging design and is compatible with any vehicle fitted with a standard rear-view mirror stem.
Installation Notes
Setup Guide — No Tools Required · Under 2 Minutes
Remove the metal cap from the glass bottle and set aside.
Using a small pipette or the bottle dropper, carefully fill the bottle with your chosen perfume or essential oil to the desired level (maximum 8ml).
Replace the metal cap securely. Do not overtighten — the stopper is designed to allow gradual passive diffusion.
Thread the hanging rope through the cap loop if not pre-attached, and tie a secure knot.
Loop the rope over your rear-view mirror stem and adjust the hanging length to your preference. The bottle should hang freely without touching the windscreen.
Allow 10–15 minutes for the fragrance to begin diffusing naturally into the cabin air.
⚠ Note: Do not overfill the bottle. Ensure the cap is seated firmly before driving to avoid spillage onto interior trim. Avoid placing the bottle in direct prolonged sunlight, which may accelerate diffusion and cause rapid fragrance loss. Keep away from leather and light upholstery surfaces when filling.
Elevate Every Journey
Your Land Rover deserves more than a generic air freshener. This glass diffuser bottle brings your chosen fragrance into the cabin on your terms — refined, refillable, and entirely in keeping with the vehicle around it. Browse the full Discovery Interior collection at Victorious Automotive.
Shop Discovery Interior Accessories
Use code 22GET20 for 20% off any 2 items
⭐ 4.9/5 from 12,300+ verified reviews
🚚 Worldwide Shipping via DHL, FedEx & UPS
↩ 30-Day Money-Back Guarantee
📞 Mon–Fri 9am–7pm · +44 203 943 9919
Victorious Automotive is an independent aftermarket accessories retailer. This product is not manufactured by, affiliated with, or endorsed by Jaguar Land Rover Limited, Land Rover, Range Rover, Defender, or any OEM brand referenced on this page. Vehicle names and model codes are used for fitment reference purposes only. All trademarks remain the property of their respective owners.


Car Auto Brush Dust Collector
£ 4.74
Victorious · Detailing · Cleaning Tools
Car Auto Brush Dust Collector – Microfibre Detailing Tool
Professional-grade microfibre dust removal brush designed to reach every crevice and corner of your vehicle's interior and exterior.
Microfibre + PP + Nylon
Universal Fit
Lightweight Design
Deep Cleaning
Crevice Access
Overview
Whether you're maintaining a Land Rover Defender, Range Rover Sport, Discovery, or any premium vehicle, dust and debris accumulate in dashboard crevices, air vents, door panels, and hard-to-reach trim areas. Standard cloths simply push dust around—they don't extract it. This microfibre dust collector is engineered to capture and hold fine particles at the fiber level, leaving surfaces genuinely clean.
The brush combines soft microfibre bristles with reinforced PP and nylon construction, giving you the precision of a detailer's tool without the professional-grade price tag. The universal design works on any vehicle interior or exterior. At just 30g, it's lightweight enough for extended use but durable enough for daily detailing routines.
Professional detailers have used microfibre technology for years because it works. The fibers are split to a microscopic level, creating millions of tiny hooks that trap dust, oils, and allergens rather than scattering them. Use it dry for quick dust removal or with a light misting of detail spray for deeper cleaning on vents, trim, and panel gaps.
What's Included
🧹
Microfibre Dust Brush
Main cleaning tool with soft bristles
📦
Protective Packaging
Safe storage and transit
Product Highlights
Microfibre construction captures fine dust at the fiber level
PP and nylon core for durability and flex retention
Reaches tight crevices, vents, and panel gaps easily
Lightweight at 30g—comfortable for extended use
Works dry or with detail spray for deeper cleaning
Universal fit for all vehicle types and interiors
Reduces allergens and airborne particles
Safe on soft-touch materials and trim
Professional detailer approved method
Affordable alternative to electric dust tools
Compatibility
Vehicle Range
Compatibility
Range Rover Sport L461 (2022–2026)
Direct Fit
Range Rover Vogue L460 (2022–2026)
Direct Fit
Defender L663 (2020–2026)
Direct Fit
Range Rover Vogue L405 (2013–2020)
Direct Fit
Range Rover Sport L494 (2013–2020)
Direct Fit
Range Rover Velar (2018–2022)
Direct Fit
Discovery 5 (2017–Present)
Direct Fit
Discovery 4 (2009–2016)
Direct Fit
Discovery Sport (2015–Present)
Direct Fit
Range Rover Evoque (All Models)
Direct Fit
Defender 90/110 (2004–2016)
Direct Fit
Toyota Land Cruiser LC300 / LC250
Direct Fit
Mercedes G-Class (All Models)
Direct Fit
All Other Vehicles
Universal
How to Use
Dust Removal & Detailing
Dry Use: Gently brush across dashboards, air vents, and trim to capture surface dust. The microfibre fibers will trap particles rather than pushing them around.
Crevice Work: Use the brush tip to access narrow gaps between panels, door seals, and air vents where standard cloths cannot reach.
Wet Cleaning (Optional): Light mist the brush with interior detail spray and work into stubborn grime on soft-touch plastics and leather trim.
Regular Maintenance: After each use, gently tap the brush over a waste bin to release captured dust. Rinse with lukewarm water if heavily soiled, then air-dry.
Storage: Store in a dry location. The protective packaging keeps the bristles in optimal condition between uses.
Tip: Microfibre works best when the bristles are clean and dry. A weekly tap-out or monthly rinse will keep this tool performing like new for years.
Keep Your Vehicle Showroom Ready
Professional detailing starts with the right tools. This microfibre dust collector is a detailer's staple—affordable, effective, and essential for any owner who takes pride in their Land Rover, Range Rover, or Discovery's interior.
Shop Now
Use code 22GET20 for 20% off any 2 items
⭐ 4.9/5 from 12,300+ reviews
✓ 30-day money-back guarantee
🌍 Worldwide shipping via DHL, FedEx, UPS
📞 +44 203 943 9919 Mon–Fri 9am–7pm
Disclaimer: Victorious Automotive is an independent retailer specializing in Land Rover, Range Rover, Defender, Discovery, and premium vehicle accessories. We are not affiliated with, endorsed by, or connected to Jaguar Land Rover, Land Rover, Range Rover, Toyota, or Mercedes-Benz. All trademarks and vehicle names are the property of their respective manufacturers. This product is designed for universal automotive use and is compatible with all vehicle types.


Car Carbon Fiber Center Dashboard Trim for Bmw Mini Cooper
£ 41.79
Automotive · BMW Mini · Interior Trim
Carbon Fiber Center Dashboard Trim for BMW Mini Cooper F55 F56 F57
Premium carbon fiber-style interior upgrade with direct adhesive installation—transform your Mini's cockpit in minutes.
F55 F56 F57
2018+
Carbon Fiber ABS
Direct Fit
Pre-Glued
Overview
If you drive a BMW Mini Cooper F55, F56, or F57, you know the centre dashboard is one of the most visible real estate in your cockpit. This carbon fiber centre console trim elevates that focal point with a genuine carbon fibre aesthetic that catches light and adds sophistication to every drive.
Manufactured from premium ABS plastic with authentic carbon fiber finish, this trim piece measures 210×140mm and integrates seamlessly with your Mini's existing dashboard geometry. The pre-applied adhesive backing means zero faffing about with glues or clips—position and press. No tools required.
Beyond aesthetics, this trim also shields the underlying plastic from scratches, scuffs, and UV degradation. It's the kind of detail that separates a well-maintained Mini from the rest, signalling to everyone inside that you've invested in your car's presentation.
What's Included
🎯
1× Carbon Fiber Centre Console Trim
210×140mm, pre-glued
🛠
Pre-Applied Adhesive Backing
No glue gun needed
Product Highlights
Premium ABS plastic with authentic carbon fiber pattern
Direct adhesive backing—no drilling or fasteners
Improves interior visual hierarchy and perceived quality
Protects factory plastic from scratches and UV fading
Lightweight: 150g keeps weight distribution unchanged
Perfectly sized for F55, F56, and F57 centre console
Water and UV resistant finish holds colour over time
Black matte carbon finish pairs with any interior trim
Fits flush with factory dashboard contours
One-minute installation—no removal of airbag or electrics
Compatibility
Model
Gen
Years
Fit
Mini Cooper 3-Door
F56
2014–2023
Direct Fit
Mini Countryman
F55
2014–2023
Direct Fit
Mini Convertible
F57
2015–2023
Direct Fit
Mini Cooper SE (Electric)
F56
2019–2023
Direct Fit
Mini Cooper 5-Door
F56
2014–2023
Direct Fit
First-Gen Mini (R50/R53)
2001–2006
—
Not Compatible
Installation
Difficulty: Beginner | Time: 5 minutes
Clean the centre dashboard with a microfiber cloth and isopropyl alcohol. Ensure the surface is completely dry.
Peel back the adhesive film slowly from one corner of the trim backing.
Align the trim with the centre console—start at the top edge and work downward.
Press firmly across the entire surface for 10–15 seconds to ensure full contact.
Allow 24 hours for the adhesive to cure before exposing the trim to heat or moisture.
Note: If your dashboard has a protective film or coating, lightly sand with 220-grit paper before application. Avoid installation in temperatures below 15°C; adhesive bonds best at room temperature.
Elevate Your Mini's Interior Today
Transform your centre console from standard to striking with this carbon fiber trim. A small detail that speaks volumes about your attention to quality.
Shop Now
Use code 22GET20 for 20% off any 2 items
4.9★ from 12,300+ reviews
✓ 30-day money-back guarantee
✓ Worldwide DHL, FedEx, UPS shipping
📞 +44 203 943 9919 (Mon–Fri 9am–7pm)
Disclaimer: Victorious Automotive is not affiliated with, endorsed by, or connected to BMW Group, Mini Cooper, or Bayerische Motoren Werke AG. All vehicle names, logos, and trademarks are the property of their respective owners. This product is manufactured as an aftermarket accessory and is not an official BMW or Mini product. Installation and use are at the customer's own risk. Always consult your vehicle handbook before installation.
We are here to help, Our Phone lines are open Monday to Friday 9-7PM